

Successful nuc installation is a 48-hour process where patience during the orientation phase is far more critical than the physical transfer itself. If you're amongst those learning how to install a nucleus colony uk, you've likely spent weeks preparing your apiary, yet the fear of a queen taking flight or the unpredictable weather disrupting the transition can make any beekeeper feel uneasy. It's natural to worry about whether you've chosen the right window or if your 5-frame or 6-frame configuration is set up correctly for rapid expansion.
Mastering this transition doesn't have to be a stressful ordeal. This guide provides a professional, step-by-step roadmap to settling your bees safely and ensuring they thrive from day one. We'll show you how to manage the move with the confidence of a seasoned expert, covering everything from the initial arrival at your site to the first inspection. You'll learn the precise techniques required to transfer your colony into a British National Hive, ensuring your bees are protected, productive, and ready to build out their new home.
Key Takeaways
- Organise your British National Hive and BBWear protective gear in advance to ensure a smooth, professional transfer.
- Allow for a vital orientation period by placing the nuc box in its permanent location before opening the entrance.
- Discover the exact steps for how to install a nucleus colony uk, including the correct method for swapping the travel box with your full brood chamber.
- Support rapid colony expansion by feeding 1:1 sugar syrup immediately after installation to encourage comb building on new frames.
- Evaluate the benefits of 5-frame versus 6-frame nucleus colonies to determine which resource level best suits your 2026 seasonal goals.
Preparing Your Apiary for a New Nucleus Colony
Preparation is the hallmark of a professional beekeeper. Before your bees arrive, you must ensure their new environment is ready to receive them without delay. Understanding how to install a nucleus colony uk begins long before the bees arrive at your gate. You should organise your British National Hive by removing the centre frames to create a void. This simple step prevents unnecessary fumbling whilst you are handling live frames. Check the weather forecast for your scheduled delivery day; you are looking for a calm, dry window with temperatures consistently above 14°C. High winds or driving rain will chill the brood and stress the queen during the transfer.
Before diving into the logistics, it is helpful to understand What is a Nucleus Colony? and why its compact size is so beneficial for establishing a new apiary. A nuc is essentially a colony in miniature, and your goal is to expand that potential into a full-sized brood box as efficiently as possible.
The Essential Beekeeping Kit List
Your equipment must be clean and functional. A well-lit smoker is your most important tool for maintaining a calm atmosphere. Use natural fuel to produce a cool, thick smoke that gently masks the bees' alarm pheromones. You will also need a high-quality hive tool to separate frames that may have been secured with propolis during transit. Safety is paramount, so ensure you have a reliable BBWear bee suit ready. These suits offer the professional-grade protection needed to work with confidence. When your nuc arrives, you will notice a travel screen on the box. This is vital for temperature regulation, allowing heat to escape so the colony doesn't overheat during its journey across the UK.
Positioning Your Hive for Success
The location of your hive stand is a permanent decision. Bees orient themselves to the specific coordinates of their entrance; moving a hive even a few feet later can cause significant confusion and foraging loss. Choose a site that receives plenty of early morning sun. This warmth encourages the bees to start foraging earlier in the day, increasing the colony's productivity. Protection from prevailing winds is equally important to help the cluster maintain its internal temperature. Ensure there is a clear flight path of at least two to three metres in front of the entrance. This allows the bees to come and go without obstruction, which is a critical factor when learning how to install a nucleus colony uk for long-term success.
Arrival Day: Settling Your Bees and Orientation
Once your colony arrives, the temptation to peek inside is immense. Resist it. The first step in learning how to install a nucleus colony uk is understanding that your bees have just endured a journey and need immediate stability. Place the nuc box on the hive stand exactly where the full-sized hive will eventually sit. Align the entrance to face the same direction you planned for the permanent colony. Opening the entrance immediately is vital. This allows the bees to perform their first orientation flights and regulates the internal temperature of the box.
If you are using a correx or poly box, be mindful of solar gain. Whilst our specialist 2-in-1 poly nucs provide excellent insulation, any small container can overheat if left in direct midday sun. Prop a board or some insulation over the top to provide shade without blocking the entrance or the travel screen. Your goal on day one is to minimise further stress to the colony.
Understanding Orientation Flights
You will notice bees hovering in front of the hive, flying in widening circles. They aren't lost; they are mapping the apiary landmarks and the specific position of their new home. This is a critical phase of how to install a nucleus colony uk. If you transfer the frames into a full hive before these flights occur, you risk significant drift where foragers return to the wrong spot. Occasionally, you might see bearding where bees cluster on the outside of the box. This is usually a sign they are simply cooling the hive or waiting for space to enter. As long as they are calm, there is no cause for alarm.
The 24-Hour Rule
Patience is your greatest asset during arrival day. We recommend a minimum 24-hour settling period before attempting the physical transfer. This duration allows the colony's pheromone levels to stabilise after the vibrations and stresses of transport. A calm queen is far less likely to take flight or be balled by her own workers during the move. You can identify a settled colony by observing the entrance. When you see foragers returning with bright baskets of pollen, it's a clear signal the bees have accepted their new location and are ready for the transition to their full British National Hive.
The Transfer: How to Install Your Nucleus Colony Step-by-Step
Executing the physical transfer requires steady hands and a methodical approach. When learning how to install a nucleus colony uk, the secret to a calm move lies in the precision of your movements. Start by gently smoking the nuc entrance to signal the bees to gorge on honey, which makes them less likely to sting. Lift the nuc box and place it to one side; then, position your full British National Hive directly on the stand in the nuc's original spot. This ensures returning foragers fly straight into the new hive rather than searching for the travel box.
Open the nuc box and identify the first frame. It's vital to transfer frames one by one, maintaining their exact original order and orientation. If frame three was facing the entrance in the nuc, it must face the entrance in the full brood box. This preserves the internal structure of the colony and prevents the bees from having to reorganise their stores or brood nest. Whilst you're moving the frames, keep a keen eye out for the queen. If you see her, ensure she is safely on the frame as you lower it. Don't spend excessive time searching if you see healthy, pearly-white larvae or eggs; these are clear signs she is present and laying.
Frame Handling and Placement
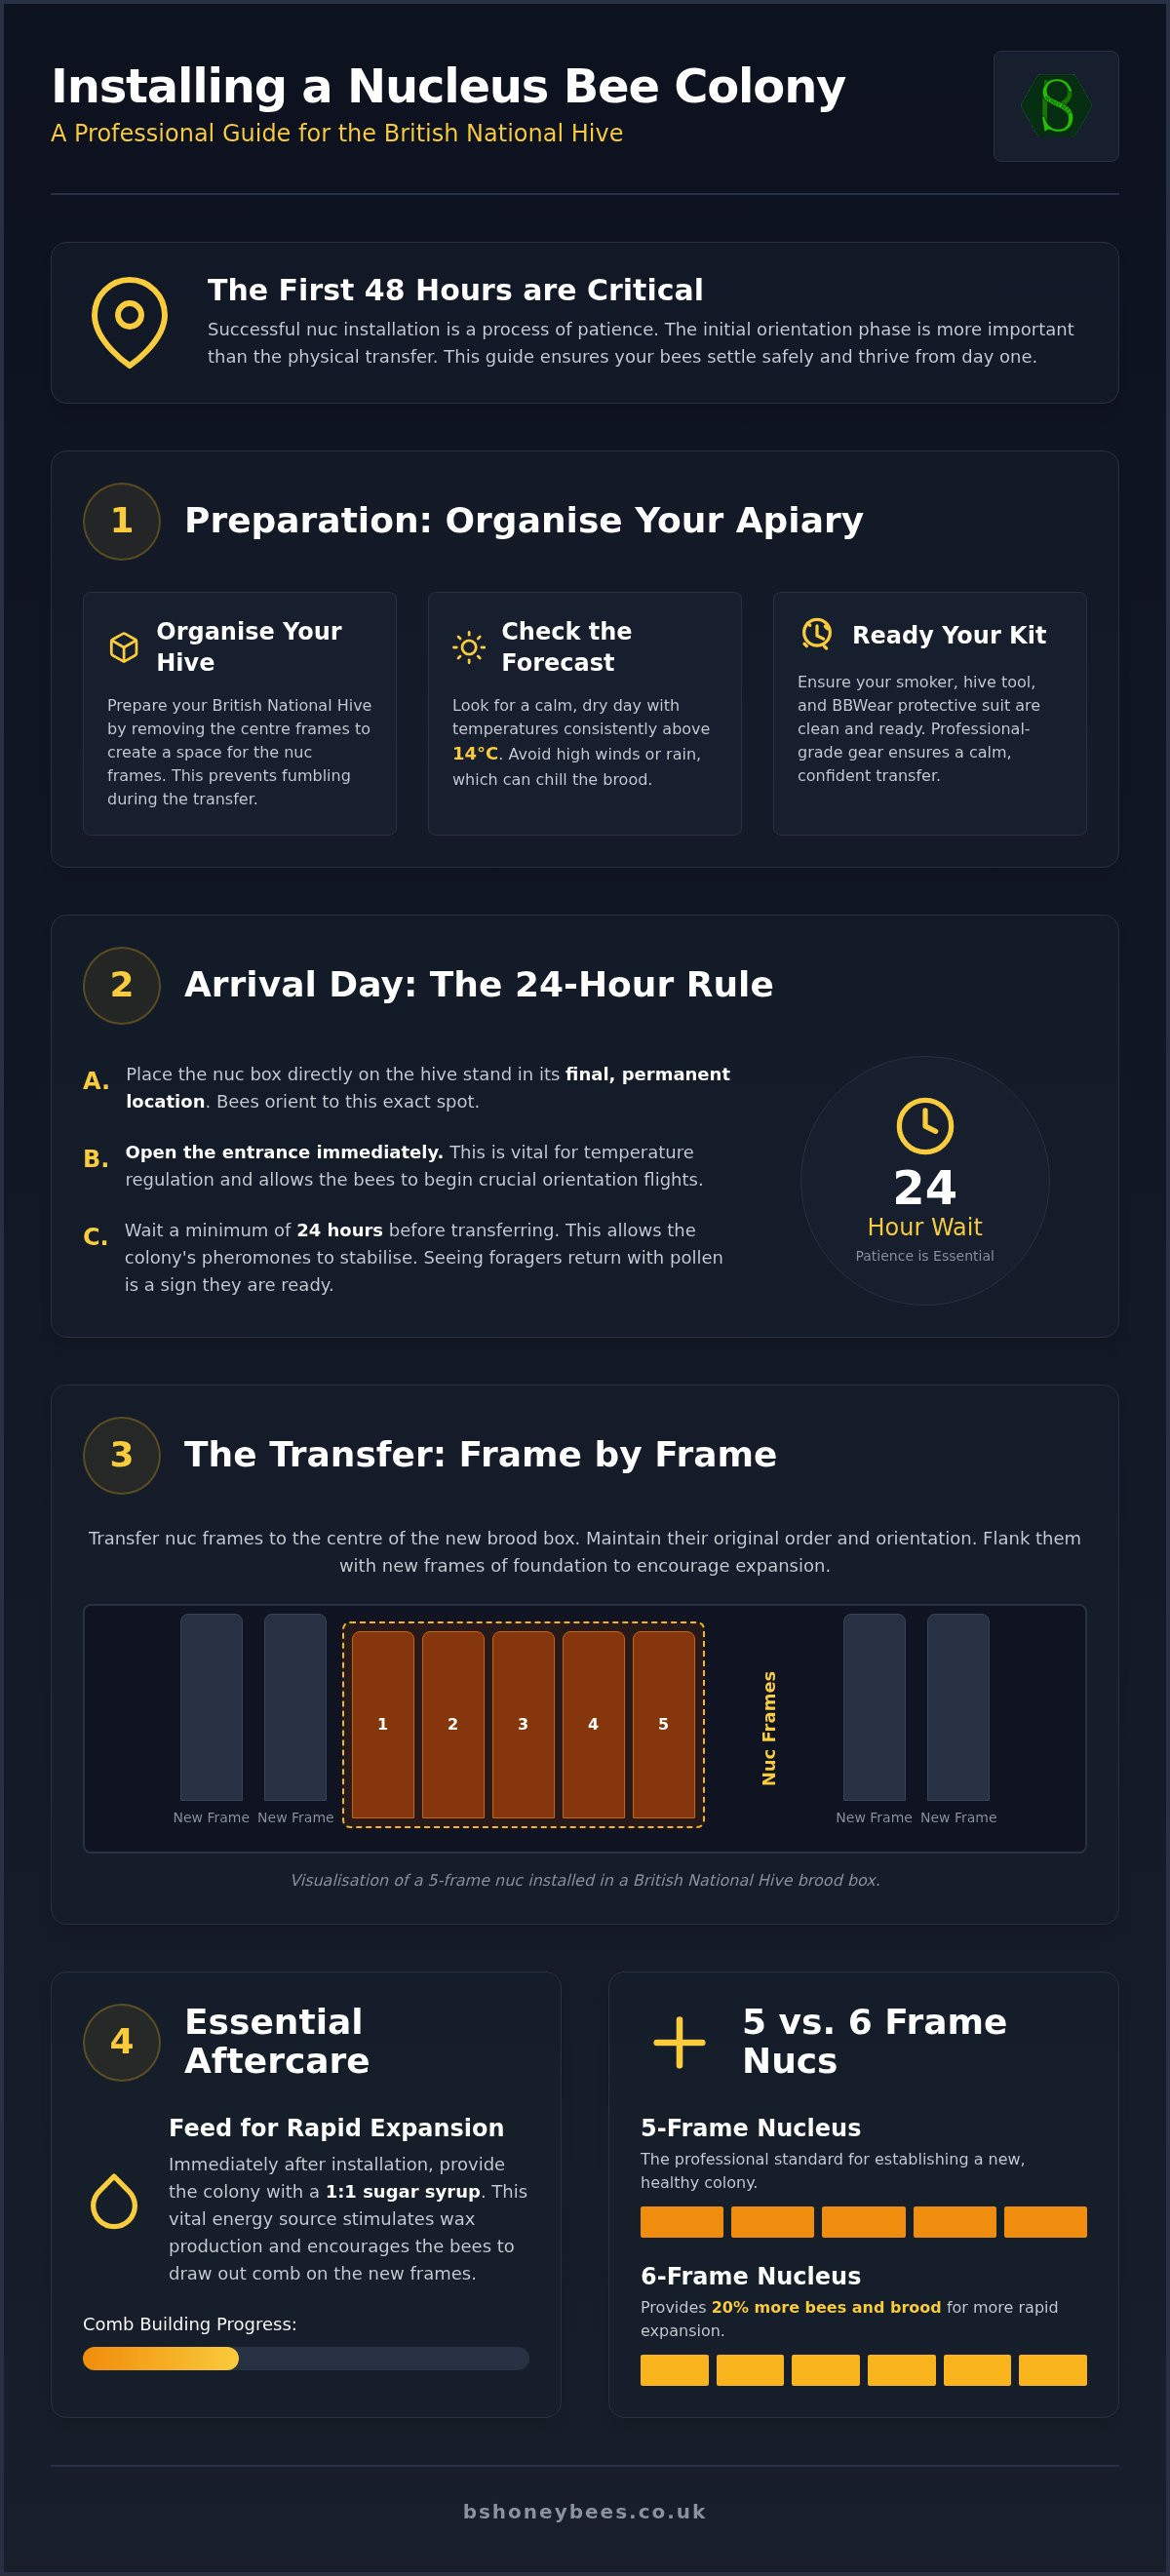
Position the transferred frames in the centre of your new hive. This keeps the brood nest together, which is essential for maintaining the high temperatures required for larval development. Use your hive tool to gently lever frames apart before lifting. Avoid sliding frames against each other, as this can "roll" and kill bees. Once the nuc frames are in place, fill the remaining space on either side with new frames and foundation. This encourages the colony to expand outwards into the full-sized box as the population grows.
Managing Different Bee Breeds
Understanding the temperament of your bees is a key part of how to install a nucleus colony uk. For instance, F1 Buckfast queens UK are bred for their prolific nature and exceptionally calm temperament. They often remain still on the frames during a transfer, making them a superb choice for those new to the craft.
Conversely, Carniolan bees are known for their rapid spring buildup. They may require a slightly more decisive approach to ensure they don't feel overcrowded during the transition. Regardless of the breed, watch for defensive "pinging" against your veil. If the bees remain calm and continue their work whilst you handle the frames, the colony is settled. Recognising these subtle shifts in behaviour is what separates a confident beekeeper from a hesitant one.
Essential Aftercare: Feeding and Monitoring Your New Colony
The work doesn't end once the frames are settled in the brood box. The first few weeks are the most vulnerable time for a developing colony, and your management during this period dictates the season's success. Your primary goal is to support the bees as they expand from their compact nuc configuration into a full-sized British National Hive. High-energy output is required to draw out wax on the new foundation frames you've provided. Without a steady supply of resources, the expansion will stall, and the queen may reduce her laying rate to conserve stores.
Monitoring the entrance from a distance is your best tool for assessing health without causing stress. Look for steady, purposeful flight paths and foragers returning with varied pollen colours. This indicates that the colony has successfully navigated the transition of how to install a nucleus colony uk and is actively foraging in the local area. If you notice defensive behaviour or "pinging" at the entrance, ensure there are no external threats like wasps or robbing bees from neighbouring hives.
Feeding for Growth
Provide a 1:1 sugar syrup immediately after installation to encourage rapid comb building. This ratio, consisting of one part white granulated sugar to one part water by weight, mimics a natural nectar flow. Use a rapid feeder or a contact feeder placed directly over the crown board hole. These designs allow the bees to access stores easily whilst maintaining the hive's internal temperature. Consistency is vital whilst the colony expands towards ten or more frames. However, you must be careful not to "choke" the brood nest. If the bees store too much syrup in the central frames, the queen will lack the empty cells she needs to lay eggs. Stop feeding once the colony has drawn out eight or nine frames, or when a strong natural nectar flow begins. To prevent robbing, always reduce the hive entrance to a small gap of about two to three centimetres during feeding.
The First Full Inspection
Resist the urge to open the hive for at least seven days after the initial transfer. Frequent disturbances can lead the workers to ball the queen or cause her to stop laying. When you perform your first full inspection, focus on colony health rather than just finding the queen. Look for eggs, healthy larvae, and a solid pattern of sealed brood. This is the critical window to identify drone laying queen symptoms UK, such as scattered, domed cappings or multiple eggs in a single cell. Catching these issues early allows for a swift requeening before the worker population dwindles. Always record your findings in a hive log to track the colony's momentum. To ensure you start the season with the best possible genetics, browse our range of F1 Buckfast and Carniolan nucleus colonies today.
Why Your Choice of Nuc Matters: 5-Frame vs 6-Frame Comparisons
Selecting the right colony size is just as important as knowing how to install a nucleus colony uk correctly. The choice you make dictates your initial management strategy and the speed at which your apiary becomes productive. A 5-frame nuc is the traditional UK standard, designed for rapid expansion during the peak spring nectar flow. In contrast, a 6-frame nuc offers approximately 20% more bees, brood, and food stores. This extra frame provides a significant buffer for those investing in overwintered nucs for sale UK, as these colonies arrive with a higher population density ready to explode into action.
Material choice also plays a decisive role in early-season success. Whilst wood is traditional, poly nucs offer superior insulation that is vital for colony survival during erratic UK springs. A well-insulated box allows the bees to maintain the 35°C brood nest temperature with less effort, meaning more energy is spent on foraging and wax production rather than simply staying warm.
The 5-Frame Nucleus Advantage
The 5-frame configuration is frequently the "sweet spot" for buying bees for the first time. Its lighter weight makes it exceptionally easy to handle during the delicate orientation phase. These nucs are fully compatible with standard correx carriers, which makes them highly portable for collection. Because the colony is slightly smaller than its 6-frame counterpart, it gives a beginner a more manageable window to observe and learn bee behaviour before the population fills the full British National brood chamber. It represents an efficient, high-standard entry point into beekeeping.
The Benefits of a 6-Frame Poly Nuc
For beekeepers prioritising resilience and momentum, the 6-frame poly nuc is a superior choice. The specialist 2-in-1 poly nucs we provide offer thermal properties that far exceed timber. This extra insulation is a game-changer during cold snaps. That sixth frame often contains additional stores, acting as a vital safety net during the "June gap" when natural forage can suddenly become scarce. This configuration is robust enough to be used as a permanent "backup" colony, allowing you to raise queens or support other hives if needed.
Your decision should align with your specific hive management goals. If you want a colony that grows steadily alongside your developing skills, the 5-frame is excellent. If you require a weather-resistant, resource-heavy start, the 6-frame poly nuc is the professional's preference. Regardless of your choice, following the correct protocols for how to install a nucleus colony uk ensures your investment thrives throughout the 2026 season.
Launch Your 2026 Beekeeping Season with Confidence
Mastering how to install a nucleus colony uk is the first major milestone in your beekeeping journey. By prioritising the 24-hour orientation period and ensuring a methodical frame transfer, you provide your bees with the stability they need to expand rapidly. Success depends on maintaining high standards, from the initial site selection to the consistent aftercare and feeding required to build out a full British National Hive. A disciplined approach during these first 48 hours sets the tone for a productive and healthy season.
Start your season on the right foot with our expertly bred F1 Buckfast and Carniolan stock. We specialise in high-performance 2-in-1 poly nucs designed for superior insulation and better survival rates in the unpredictable UK climate. With our nationwide delivery expertise and live arrival guarantee, you can focus on the reward of managing a thriving colony. Browse our 2026 Nucleus Colonies and Start Your Apiary Today. Your journey towards becoming a proficient beekeeper begins with these first, confident steps, and we're here to ensure your success at every stage.
Frequently Asked Questions
How soon after delivery should I open the nuc entrance?
Open the entrance immediately after placing the nuc box on its permanent stand. Your bees have been confined during transit and require fresh air and the opportunity to orient themselves. Understanding how to install a nucleus colony uk starts with this immediate release, as delaying it can cause the colony to overheat in correx or poly travel boxes. Ensure the entrance is clear so the first foragers can map local landmarks without any delay.
What should I do if the queen is not on the frames during transfer?
Check the empty travel box thoroughly if you don't spot the queen on the frames. She often hides on the floor or walls of the container during the disruption of a move. If she isn't there, don't panic. As long as you see fresh eggs and healthy larvae, she is present and working. Close the hive and wait for your first full inspection in seven days to confirm her laying pattern.
Do I need to feed my nucleus colony if there is a nectar flow?
You should still provide a 1:1 sugar syrup even during a nectar flow. This ensures the colony has the constant resources needed to draw out new wax foundation on the empty frames you've added. Building comb is an energy-intensive process for a small colony. Consistent feeding helps them expand rapidly into the full brood box. Stop once they have drawn out most of the frames to prevent them from becoming honey-bound.
Can I install a nucleus colony in the rain?
Avoid installing your colony in the rain whenever possible. Opening the hive in wet or cold conditions can quickly chill the brood and lead to larval death. It also makes the bees significantly more defensive. If the weather is poor, leave the bees in their travel box with the entrance open for another day. Wait for a dry, calm window with temperatures above 14°C to ensure a safe and professional transfer.
How long does it take for a nuc to fill a full National Hive?
A healthy colony typically takes three to six weeks to fully occupy a British National Hive. This timeline depends on the strength of the forage, the local weather, and how consistently you feed them. When learning how to install a nucleus colony uk, remember that rapid expansion is the goal. Once the bees cover eight or nine frames, it's time to add your first super to provide extra space for honey.
What is the best time of day to transfer a nuc to a hive?
The ideal time for the transfer is between 11 am and 2 pm on a sunny day. During these hours, many of the older, more defensive foragers are out in the fields. This leaves the younger, calmer nurse bees in the hive, which makes the physical move much easier for the beekeeper. Ensure the sun is high enough to keep the brood warm whilst the frames are briefly exposed to the air.
Should I use smoke when transferring a calm breed like Buckfast?
Always use a light puff of smoke, even when working with exceptionally calm breeds like F1 Buckfast bees. Smoke disrupts the bees' alarm pheromones and encourages them to gorge on honey, which keeps them occupied during the move. Whilst these bees are bred for their gentle temperament, a small amount of smoke remains a professional standard for ensuring the queen's safety and preventing any accidental stings or defensive behaviour during the process.
What happens if I move the nuc box more than 3 feet after orientation?
Moving the box more than three feet will cause your foragers to become lost and confused. Bees map their home with incredible precision based on their initial orientation flights. If the entrance is gone when they return, they will cluster at the old spot and eventually perish. If you must reposition the colony, move it in increments of no more than two feet per day to ensure the foragers can adjust.