

A nuc commonly takes 1-2 weeks to expand enough to cover its brood box, depending on the weather and nectar available. That’s a useful early measure of how long a nuc takes to establish, but progress doesn’t stop there: look for growing numbers of bees, fresh comb and a consistent brood pattern.
It’s natural to want to know how long a nuc takes to establish, especially after moving it into a full-sized hive. Inspecting too soon can disrupt the colony’s early routine, so timing matters as much as recognising healthy progress.
This guide explains how to transfer a nuc, what signs show it is building strength and when to carry out the first inspection. You’ll also learn how weather, food and space affect its progress, so you can give the colony room to grow without rushing it.
Key Takeaways
- Give a newly transported nuc time to settle at its permanent position before opening the entrance.
- Look for steady brood, fresh comb, active foraging and stores as signs the colony is building strength.
- Time the first inspection for around 7-10 days after installation, then avoid opening the hive too frequently.
- Match the colony’s space and feeding to its stage of growth, and consider how weather and available forage may affect progress.
- Check that the queen is laying and that the bees can cover their brood; these clues help you judge how the nuc is developing.
Moving a nuc into a full-sized hive
Install a nucleus carefully, then give the colony time to settle. The transfer itself is quick, but choosing a suitable site, keeping the frames in order and providing appropriate space all help the bees resume normal activity.
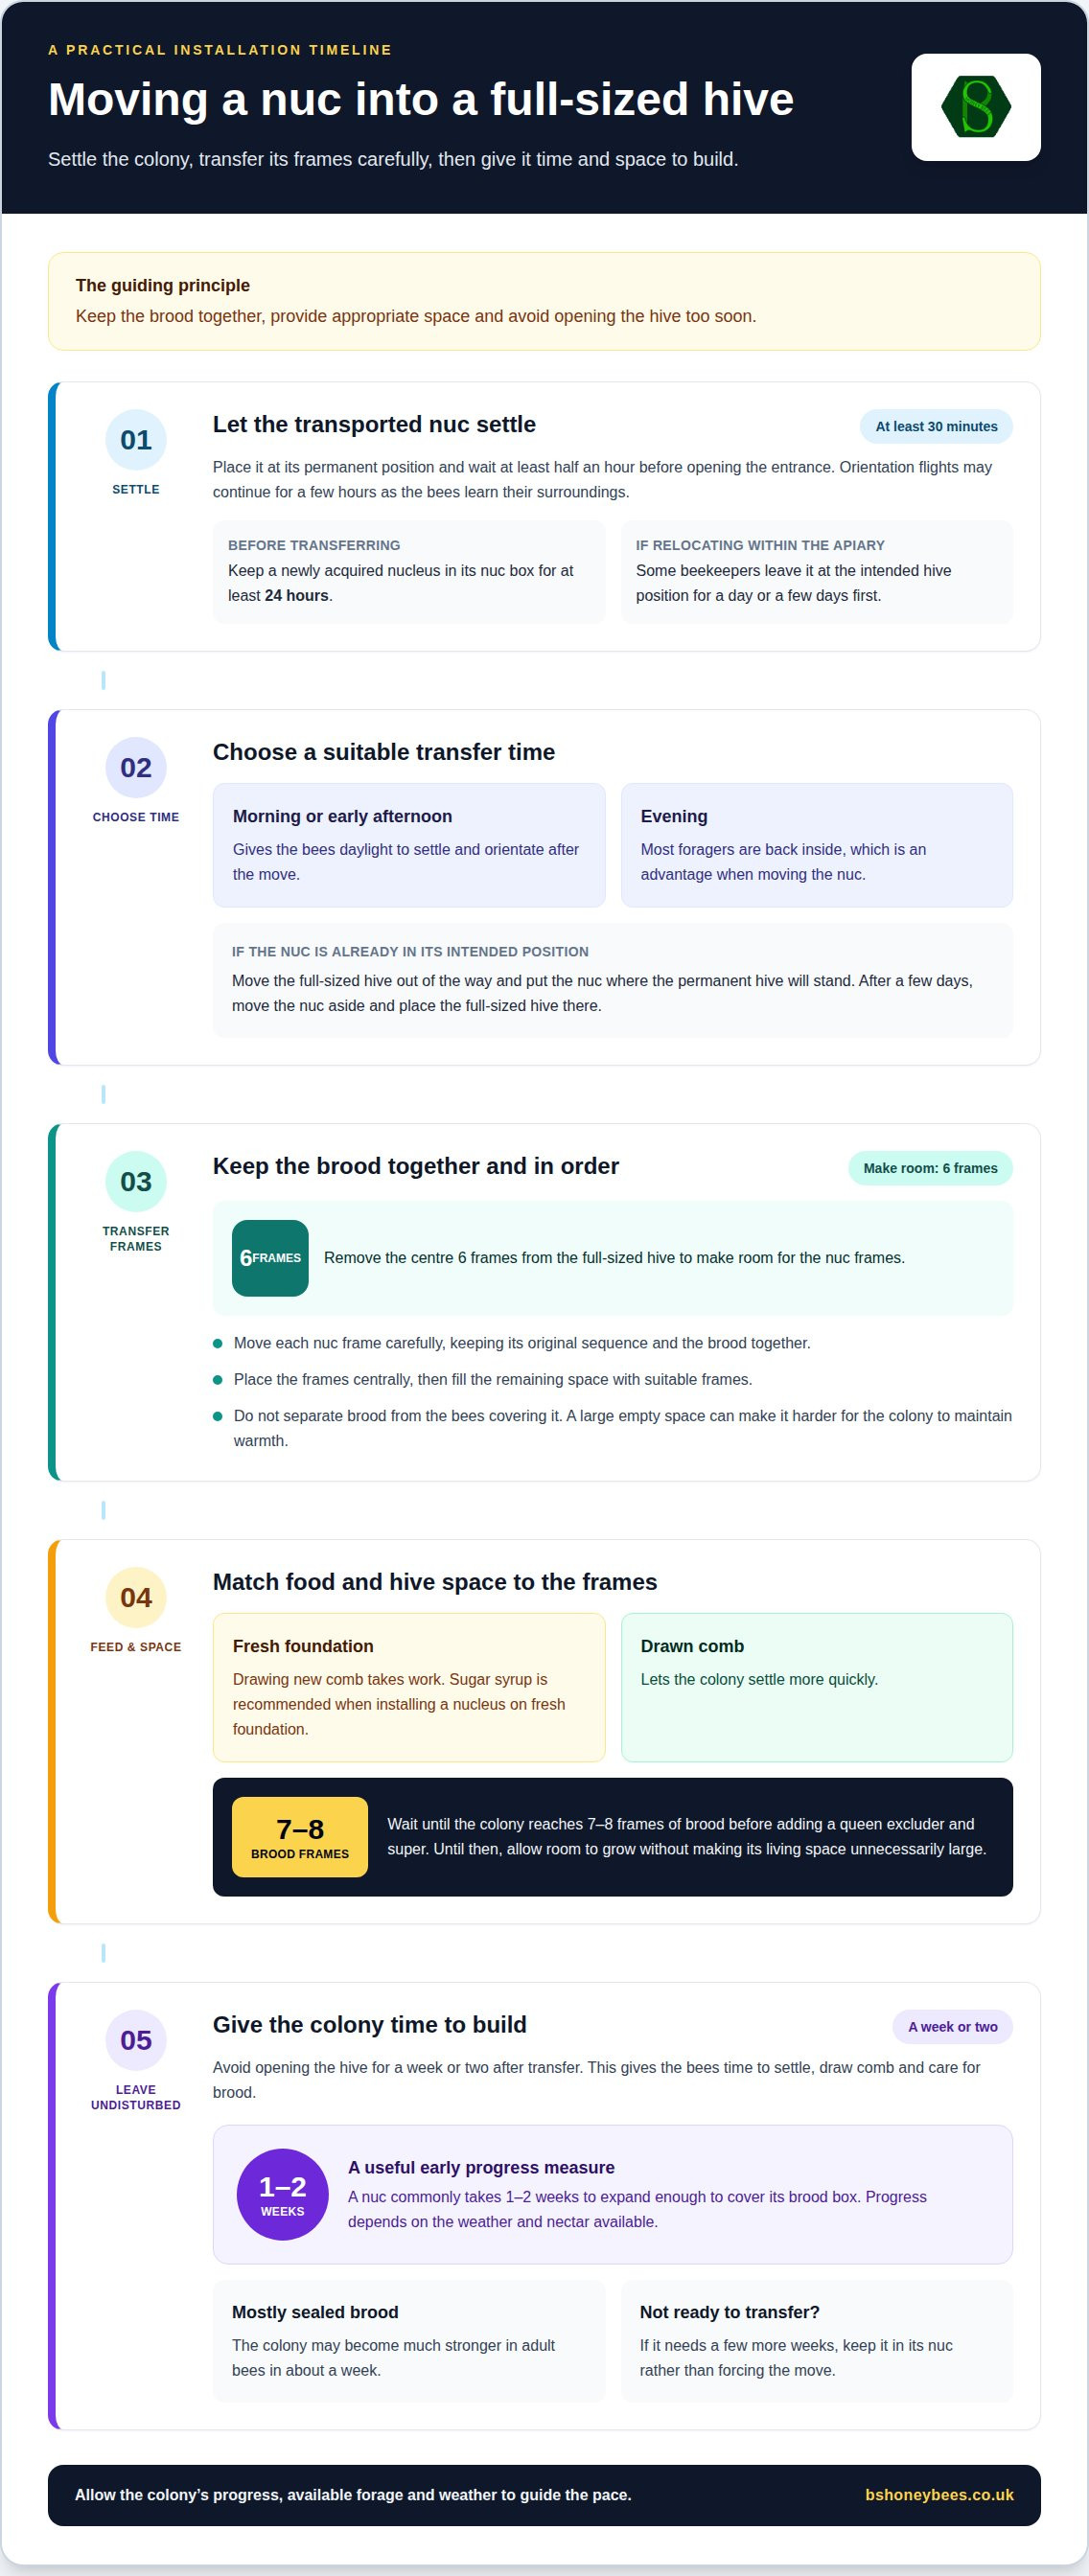
- Let the transported nuc settle before opening it. Place it at its permanent position and wait at least half an hour before opening the entrance. Orientation flights can continue for a few hours as the bees learn their surroundings. Keep a newly acquired nucleus in its nuc box for at least 24 hours before transferring it. If you’re relocating it within the apiary, some beekeepers leave it at the intended hive position for a day or a few days first.
- Choose a transfer time that suits the colony. Morning or early afternoon gives bees daylight to settle and orientate after the move. Moving the nuc in the evening has another advantage: most foragers are back inside. If the nuc is already in its intended position, move the full-sized hive out of the way and place the nuc where the permanent hive will stand. After a few days, move the nuc aside and put the full-sized hive in its place.
- Transfer the frames in their existing order. Remove the centre 6 frames from the full-sized hive to make room. Move each nuc frame carefully, keeping the brood together and maintaining its original sequence. Place the frames centrally, then fill the remaining space with suitable frames. Avoid separating brood from the bees covering it. The colony needs enough room to expand, but a large empty space can make it harder to maintain warmth.
- Match feeding and space to the frames. Fresh foundation takes work to draw into comb, so sugar syrup is recommended when installing a nucleus on new foundation. Drawn comb lets the colony settle more quickly. Don’t add a queen excluder and super before the bees have filled the brood box. Add them when the colony reaches 7-8 frames of brood. Until then, give the nucleus room to grow without making its living space unnecessarily large.
- Leave the hive undisturbed after the transfer. A week or two without opening it gives the bees time to settle, draw comb and care for brood. A nuc usually takes 1-2 weeks to expand enough to cover the brood box, depending on weather and nectar availability. A colony made up largely of sealed brood may become much stronger in adult bees in about a week. If it still needs a few more weeks before transfer, keep it in its nuc rather than forcing the move.
Queen laying and brood replacement
- Look for eggs and young larvae when you inspect. Eggs are a useful sign of recent queen activity: in a UK bee colony, their presence indicates that a queen was in the hive within the previous 3 days. Look closely in the cells, as eggs can be difficult to spot. Eggs and young larvae also show that the colony has brood at different stages, rather than relying only on sealed brood already present when the nuc arrived. A nucleus should have a queen, or the means to raise one, such as a queen cell, eggs or young larvae.
- Read the brood pattern across several frames. Check whether brood is spread across the available brood area and whether workers are tending it. A consistent pattern tells you more than one cell or frame. Note eggs, larvae and sealed brood separately. Seeing these stages shows that brood replacement is under way; gaps or changes give you specific details to compare at a later inspection. Keep the frames in their original order, and don’t prolong the inspection just to find the queen.
- Interpret unusual eggs in context. A cell with two eggs can occur, so record what you see rather than treating one cell as proof of a failing queen. Compare it with the wider brood pattern and look for eggs in other cells. Pollen arriving at the entrance is another sign of activity. In one nuc, the queen began laying again after foragers had brought in pollen for a couple of weeks. The example illustrates why observations across the colony matter more than a single snapshot.
- Give brood time to develop before judging replacement. Existing brood continues to mature whilst the queen lays new eggs, so the adult population can change as older bees emerge and new workers develop. Track whether eggs, larvae and sealed brood remain represented at later checks. If eggs disappear, consider the full evidence, including queen cells and young larvae that could allow the bees to raise a queen. Where a replacement queen is being considered, F1 Buckfast Queens and Carniolan Queens are relevant options, but first assess the colony’s brood and queen-raising signs together.
A newly installed nuc typically spends its first few days exploring its surroundings, collecting nectar and pollen, tending brood, drawing comb and establishing its routine. During this settling period, avoid adding a queen excluder or super before the bees have filled the brood box. The larger space can make it harder for them to maintain warmth and may slow colony growth.
When assessing brood replacement, remember that a nucleus may be made by splitting one colony or taking bees and frames from several colonies, then providing a caged queen or queen cell. Its starting composition can vary. There should be enough bees to cover the brood, with unsealed brood needing more attention than sealed brood. Consider the amount of brood in relation to the bees available to cover it, and keep that balance in mind when assessing laying and brood care.
Signs of a thriving nuc
Assess several signs together rather than relying on one frame or a busy entrance. These checks help you judge whether the nucleus is developing into a stable colony.
- Check that brood is consistent and covered. Look across the brood frames for eggs, larvae and sealed brood instead of judging from one patch. A healthy nuc typically has a consistent brood pattern and enough adult bees to cover it. Unsealed brood needs particular attention because larvae rely on workers for care and warmth. If brood extends beyond the bees’ coverage, note where and reassess the colony’s strength at your next inspection.
- Compare the adult bee population over time. A thriving colony should show a growing population, not just a cluster at the entrance. During an inspection, note how many frames are occupied and whether workers cover the brood. In a nuc made largely of sealed brood, emerging bees can increase the adult population, so the colony may look stronger as it develops. Record which frames hold bees and compare your notes at a later check.
- Look for fresh comb and space being used. Comb building shows that the colony is expanding its nest. Check the edges of occupied frames and any foundation provided. In one nuc, workers had started drawing comb on the third and fourth frames. Treat fresh comb as one useful sign, not proof on its own: check whether bees are also tending brood and bringing in stores. The colony needs room to expand, but the available space should suit its current strength.
- Watch for foraging and stored food. Workers returning with pollen show that the colony is collecting resources for brood rearing. Nectar and pollen stored in the comb provide further evidence of activity. Foraging may increase as the nuc settles into its routine. Observe the entrance briefly before opening the hive, then check the frames for stores during an inspection. A busy entrance alone cannot tell you whether brood is developing or food is being stored.
- Check the whole colony at each inspection. Assess brood, bee coverage, comb growth and stores together. Check for Foul Brood disease at every inspection, alongside your observations of brood and colony condition. Note clear changes, such as more occupied frames or fresh comb, rather than relying on memory. A healthy nuc typically shows several signs of progress together, including active foraging, a growing population and stored nectar and pollen.
Timing the first hive inspection
- Wait approximately 7-10 days after installing the nuc. This gives the colony time to settle into its new position and establish its routine before you open the hive. An early inspection can interrupt workers as they care for brood, organise stores and explore the area. Use the waiting period to observe activity at the entrance without opening the box. Note whether bees are flying and returning with pollen, then use those observations to guide your first internal check.
- Plan the first inspection around clear objectives. Before opening the hive, decide what you need to assess: the queen’s laying, brood condition, food stores and bee coverage. A focused inspection helps you work through the frames calmly and avoid unnecessary handling. Check for eggs, larvae and sealed brood, then assess whether adult bees are tending them. Keep the inspection purposeful instead of searching every frame without a clear reason.
- Check whether food will last until your next visit. The nuc should have enough food to last until you return. Look for stores on the frames and consider the colony’s access to nectar and pollen. If stores seem limited, take that into account when planning your next check and assessing the colony’s immediate needs. Record what you find so you can tell whether stores have increased, remained similar or been used to feed brood.
- Keep inspections at least seven days apart. A newly established colony should be inspected no more often than once every seven days. During the active season, inspect the nuc every 7-10 days. This rhythm gives you regular opportunities to follow progress without opening the hive too frequently. For example, if your first inspection takes place on day eight, plan the next one no sooner than seven days later, unless an urgent concern requires attention.
- Record findings at each visit and compare them. Note the inspection date, brood stages, stores and frames covered by bees. At the next visit, compare those details with your first inspection rather than relying on memory. A simple record can show whether the queen is laying, whether food remains available and whether the worker population is expanding. If you inspect every 7-10 days during the active season, consistent notes make changes easier to identify and help you decide what to assess next.
What factors can delay establishing a NUC?
- Choose a shaded position for the nuc. A small nucleus can overheat, particularly if its entrance is small. Keep the box out of strong direct sun and ensure the entrance stays clear. Heat stress can make it harder for the colony to maintain normal activity inside the hive. Check the site at different times of day: morning shade may not last through the afternoon. A sheltered, shaded position helps the bees manage the space they occupy.
- Consider the comb supplied with the colony. A nuc on drawn comb can settle more quickly than one on fresh foundation. With fresh foundation, bees must build comb before the queen can lay in those cells or workers can store food there. This extra work can affect how quickly the colony expands. If the nuc is on foundation, watch for new comb and check that the bees are using the available frames before adding more space.
- Time feeding carefully, especially in cool weather. Avoid feeding a newly made nucleus within 3-4 days, particularly when conditions are cool. Older bees may return to their original colony, and feeding during this period can contribute to robbing. Keep the entrance small enough for the colony to defend, and observe whether bees are entering or leaving with food. Once the initial period has passed, feeding may support comb building and brood rearing when natural forage is limited.
- Don’t add extra boxes before the brood box is filled. Adding a queen excluder and super too early can slow growth. The bees may struggle to maintain warmth across the larger space instead of concentrating their efforts around brood and stores. Wait until the colony has filled the brood box, and assess how much of the available brood area it occupies. Don’t add space simply because it is ready. Match the hive to the colony’s strength.
- Allow for flying bees returning to their original site. A nuc made in the same apiary may lose foragers when they fly back to their former colony. A usual approach is to move it when many adult bees have not yet flown, helping retain more bees in the new colony. Consider where the nuc was made and where it will stand before choosing the transfer timing. If your setup needs a different arrangement, review suitable nuc options for your apiary.
BS Honey Bees
BS Honey Bees Ltd can help you choose the right starting point for a growing apiary, whether you’re sourcing a nucleus colony or preparing its full-sized home. Its 5 / 6 Frame Nucs suit beekeepers planning a new colony, while British National Hives and frames provide equipment for transferring and expanding colonies. F1 Buckfast and Carniolan Queens are also available when queen choice is relevant to your plans. Match your equipment and colony needs to your beekeeping goals, then use the inspection signs in this guide to monitor progress. For nucs, queens or hive equipment, contact BS Honey Bees Ltd to discuss your requirements.
Build your next season around what the colony shows
Let the colony’s development guide your next decisions. Knowing how long a nuc takes to establish helps you plan, but your records show how that colony responds to its site, forage and available space. Note changes as they happen and use those observations to make considered decisions about future colony management.
This approach also helps you plan when expanding your apiary or preparing for a new season. Consider the equipment and colonies you’ll need and how they fit your beekeeping goals. A clear plan makes it easier to take the next step purposefully, rather than rushing a decision based on the calendar alone.
If you’re considering your next colony or queen, contact BS Honey Bees Ltd for help. Keep observing, keep learning, and let each season build your confidence.
Frequently Asked Questions
What Is a Nucleus Hive?
A nucleus hive is a compact home for a small, developing honey bee colony. A typical nucleus is supplied on 4-5 frames and contains a queen, worker bees, brood, honey stores and pollen reserves. The frames let you transfer the colony together into a larger hive when it’s ready. Think of it as a working colony in a smaller space, rather than an empty hive awaiting bees.
When Is the Best Time to Install a Nuc?
June is a recommended starting point for beekeeping in the UK, leaving at least three months to work with the bees and prepare them for winter. How long does a nuc take to establish after installation? A nucleus usually takes 1-2 weeks to expand enough to cover the brood box, depending on weather and nectar availability. Assess the colony’s progress as well as the season.
Why Choose a Nuc Instead of a Package of Bees?
A nuc arrives as a framed colony with a queen, brood and food stores, giving you established features to monitor from the start. A package of bees is a different starting point, without the same frames and developing brood. If you’re asking, “How long does a nuc take to establish?”, its existing colony structure gives you clear signs to follow after installation, including brood, stores and comb development.
What does NUC mean in the context of establishing one?
“Nuc” is short for “nucleus”, meaning a small honey bee colony. Establishing a nuc means helping the colony settle into its new position and develop in its permanent hive. The term describes the colony, not a particular bee breed. For example, a nuc may contain a laying queen and developing brood, with workers tending the colony as it grows.