

A batch of 10 frames is a practical starting point for building your own beehive frames. Assemble each one square, with its bars aligned and foundation held securely, then match the frame code to the hive box it will sit in. Getting that code right matters as much as making a sound frame.
It’s tempting to focus on cutting and nailing, but small differences in bar width and side-bar shape affect how frames fit and space together. This guide covers assembling the bars, positioning foundation wire loops, and using glue and brad nails, as well as making frame sides from scrap timber.
You’ll also learn how British National frame codes distinguish common options, including DN4, SN1 and SN4, and why a 14×12 frame needs a purpose-made brood box. Follow the steps in order to build frames that fit your equipment and are ready for foundation.
Key Takeaways
- Start with a manageable batch of 10 frames, and keep the bars aligned so each frame sits square.
- Face the side-bar grooves towards the inside, and place the bottom bar flush with the side bars’ outside edges.
- Bend the long foundation wire loops through 90 degrees so they sit beneath the top bar, with the longer loops pointing down as you fit the foundation.
- Use glue and brad nails to secure the joints, then allow the glue to cure before adding the foundation.
- Match the frame code to the hive box: DN4 is a common brood-frame choice for a conventional National hive, while 14×12 frames need an extra-deep brood box.
Assembling top bars, side bars and bottom bars
Measure and cut the top bar, fit the two side bars, then add the two bottom bars. Keep the frame square and align its joints. Common mistakes include mixing frame types, reversing side-bar grooves and misaligning cuts. Use guarded tools carefully, and keep hands clear of blades and nail guns.
-
Make top bars and foundation grooves
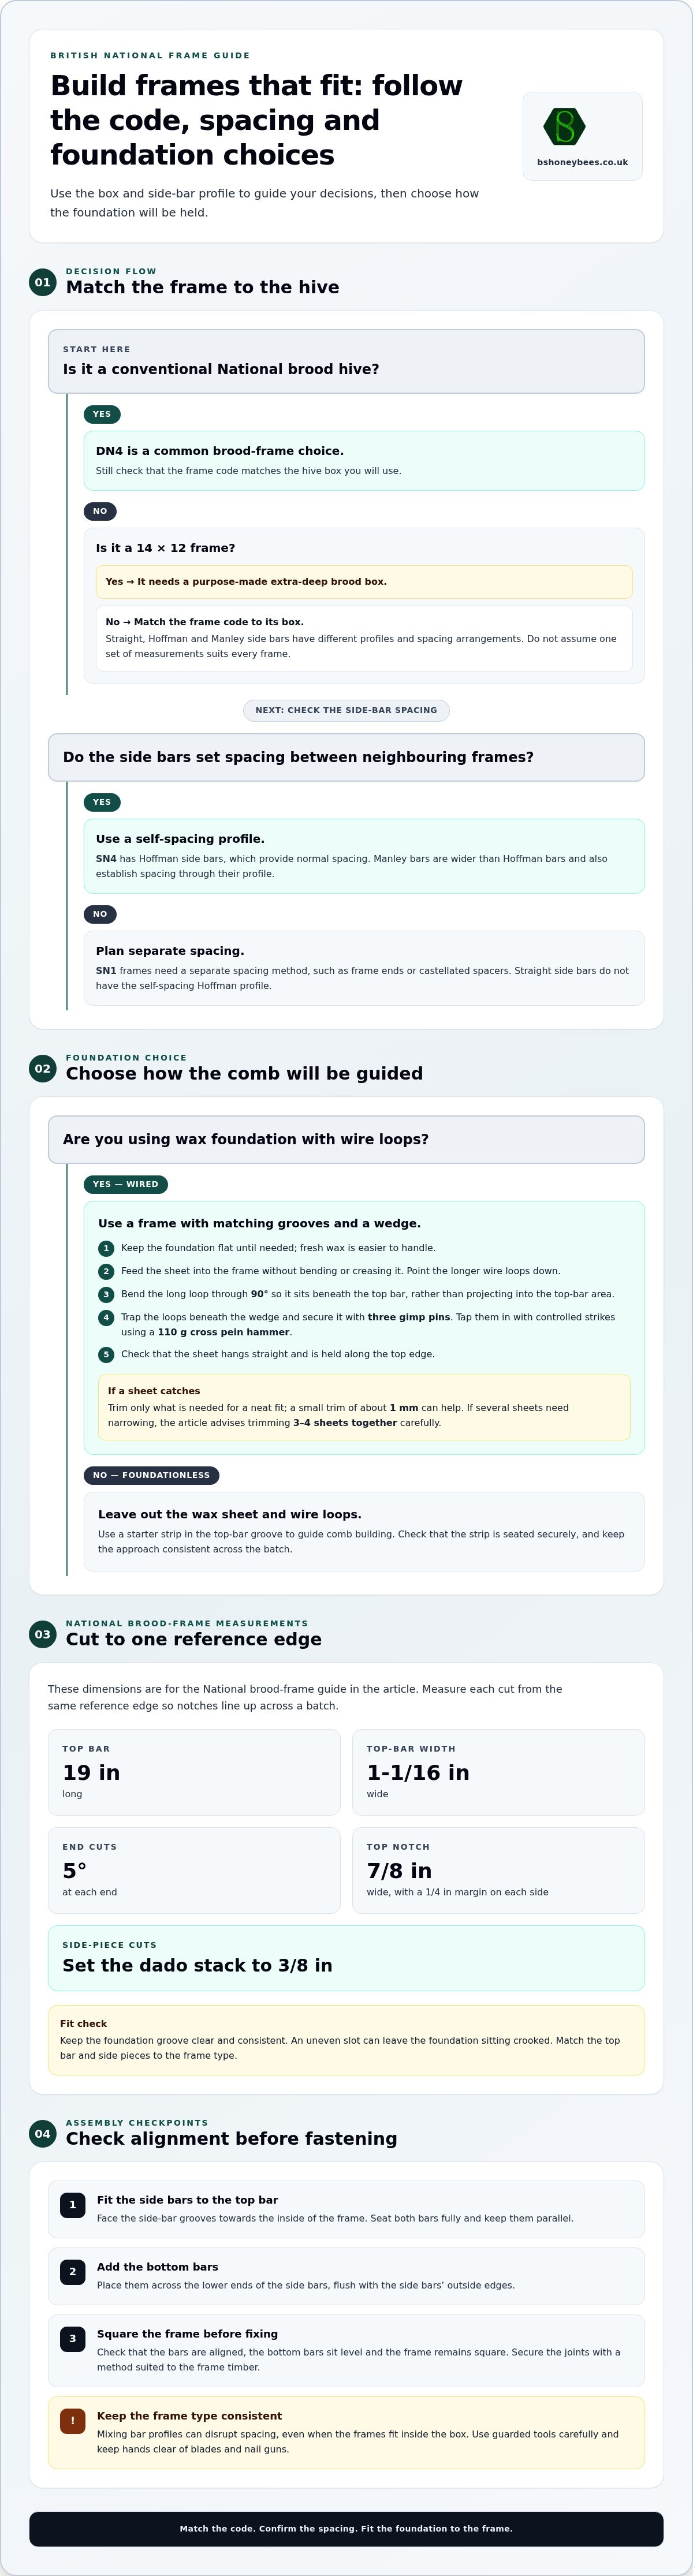
Cut the top-bar boards for this National brood-frame guide to 19 inches long and rip them to 1-1/16 inches wide. Cut each end at a 5-degree angle, then form the foundation groove and side-piece cuts. The top notch is 7/8 inches wide, with a 1/4-inch margin on each side; set the dado stack to 3/8 inches for the side-piece cuts.
Measure each cut from the same reference edge so the notches line up across a batch. Keep the foundation groove clear and consistent, since an uneven slot can leave the foundation sitting crooked. Don’t assume these measurements suit every frame: Straight, Hoffman and Manley side bars have different profiles and spacing arrangements, so match the top bar and side pieces to the frame type.
-
Assemble the side bars and top bar
Place the two side bars against the angled ends of the top bar, with the grooves facing the inside of the frame. This orientation keeps the foundation channel correctly positioned. Secure the joints with pins, using eight pins to fix the complete frame together; place the first pin approximately 3 mm from the top when fastening each side bar.
Keep both side bars parallel and fully seated against the top bar before fastening. A Hoffman side bar is self-spacing: its shape sets the spacing between neighbouring frames. Straight side bars lack this self-spacing profile, so the frame needs a separate spacing method. Manley side bars are wider than Hoffman bars and also establish spacing through their profile. “Hoffman” describes a self-spacing side-bar design, not a frame size.
-
Fit the bottom bars
Fit the bottom bars across the lower ends of the side bars, aligning them flush with the outside edges. Place each bottom bar flush with the outside edge of its side bar. This alignment helps hold the foundation in place and gives the lower frame a consistent edge.
Check that the bottom bars sit level and that the frame remains square before fixing them. SN1 frames require separate spacing, such as frame ends or castellated spacers; SN4 frames have Hoffman side bars that provide normal spacing without those additions. Keep the bar type consistent across the hive, because mixing profiles can disrupt spacing even when the frames fit inside the box.
Positioning the foundation wire loops
Feed wax foundation into the assembled frame with its longer wire loops pointing down, then bend the long loop through 90 degrees so it sits beneath the top bar. The essential tools and materials are the frame, wax foundation, wire loops, wedge, gimp pins, pliers and a small hammer.
DIY costs depend on timber, foundation, fasteners and whether you already own suitable tools. Ready-made frames avoid the assembly work. Compare the materials you need and the time involved rather than assuming home-built frames always cost less.
- Choose wired or foundationless construction. For a wired frame, use foundation with wire loops and make sure the frame has matching grooves and a wedge. Wiring adds strength, but it isn’t essential. For a foundationless frame, leave out the wax sheet and its wire loops, and use a starter strip in the top-bar groove to guide comb building. Keep the approach consistent across the batch so you can prepare frames the same way.
- Prepare the foundation before fitting it. Use fresh wax foundation, which is easier to handle, and keep it flat until needed. Foundation is relatively fragile, so fit it shortly before putting the frames to use rather than leaving completed frames in storage. Check the sheet against the frame’s opening; if it needs trimming, remove only the amount needed for a neat fit. A small trim of about 1 mm can help when a sheet catches on the frame.
- Feed the sheet into the frame. Hold the foundation upright and guide it into the frame without bending or creasing the wax. Point the longer wire loops down, then turn the long loop through 90 degrees beneath the top bar. This keeps the loop flat rather than projecting into the top-bar area. If several sheets in a packet need narrowing, trim 3-4 sheets together carefully, then fit each sheet without forcing it into the frame.
- Secure the foundation wedge. Trap the wire loops beneath the wedge, then secure the wedge with three gimp pins driven through the wedge and loops. Use a 110 g cross pein hammer to tap each pin into place with controlled strikes. Keep the pins seated in the wedge, not projecting into the foundation. Finish by checking that the sheet hangs straight and remains held along the top edge.
- Check each frame before storage. Look for a bowed sheet, loose wedge or bent loop, and correct any problems before stacking the frames. Handle wax foundation frames carefully to avoid damaging the wax. On foundationless frames, make sure the starter strip is seated securely in the top groove; a loose strip won’t provide a stable guide for comb construction.
Assembling frames with glue and brad nails
Choose a fastening method that suits your frame timber and repair preferences. A typical assembled frame uses 11 nails; glue can reinforce joints, whilst leaving it out makes later dismantling easier.
- Prepare the parts and fixings. Lay out the top bar, two side bars and bottom bars on a clear workbench. Check that the parts fit together before applying adhesive. A 110 g cross pein hammer is useful for controlled pinning, while a nail gun can speed up repeated assembly. Keep the fixings matched to the timber and joint, rather than forcing oversized nails into narrow bars.
- Decide whether to glue. Apply a small, even amount of wood adhesive to the mating surfaces if you want bonded joints. One frame-making approach uses Titebond 3, while another guide specifies epoxy as strong and moisture-resistant compared with PVA. Epoxy can be costly. Some beekeepers leave joints unglued because this makes damaged frames easier to take apart and repair.
- Secure each top-bar joint. Hold a side bar firmly against one end of the top bar, then drive a nail through the joint. Repeat at the other end, keeping each side bar square to the top bar. One guide recommends eight pins to fix the frame together, with the first pin approximately 3 mm from the top. Keep the nail path centred to reduce splitting.
- Fasten the remaining joints. Use the selected nail pattern consistently, aiming for 11 nails per frame. One method uses 20 mm 18g nails in a nail gun; another specifies nails measuring 30 x 1.6 mm. These are alternative specifications, not nails to combine indiscriminately. Check that the fasteners hold without protruding through the wood or obstructing the foundation channel.
- Check the frame before the adhesive sets. Set the assembled frame on a flat surface and compare its corners. Correct any twist while the joints can still be adjusted. Remove squeezed-out adhesive before it hardens, especially around grooves and foundation slots. An out-of-square frame may not sit evenly in the hive or maintain consistent spacing.
- Fit the tack strip where required. For a wax-foundation frame with a tack strip, secure it using three 3/4-inch brad nails. Keep the strip aligned along the top bar so it holds the foundation edge evenly. Allow frame glue to cure overnight before adding wax foundation. That pause prevents handling the frame while the bonded joints are still setting.
Building Langstroth hive frame sides from scrap timber
Use straight, sound scrap timber and mill it into matching side pieces before assembly. Consistent thickness and profile are essential for each Langstroth frame to fit and space as intended.
-
Select scrap timber for frame sides
Choose straight 2×4 lumber with enough clear length to cut frame-side blanks. Check each piece along its length for bowing, splits and loose knots before you start. A consistent grain and sound surface make it easier to slice matching sides and cut a clean tack-strip groove.
Sort the timber first, then prepare separate blocks for deep frames and medium supers. One build used 10 frame-side blocks for deep frames and 10 for medium supers. Keep the two sizes in clearly marked groups so their profiles don’t get mixed during cutting or assembly.
-
Avoid unsuitable frame timber
Reject pieces with rot, deep cracks, severe warping or loose knots where you plan to cut. These defects can weaken a narrow frame side or make it difficult to produce an even profile. Inspect the whole piece, not just the face that will show after milling.
Even second-quality frame bars need careful sorting: an estimate puts significant defects requiring rejection at 1-2%. Treat that as a prompt to inspect every blank, rather than relying on the timber grade alone. Set aside any side that splits during cutting or has a groove that breaks through the edge.
- Slice the side blanks evenly. Rip the selected timber into pieces 3/8 inches thick. Use a guide to keep the cut consistent along each blank, then compare pieces before shaping them. Matching thickness helps the finished sides sit evenly against the top and bottom bars.
- Cut the tack-strip groove with a controlled allowance. Form the groove so about 1/16 inch of wood remains to break off during assembly. That thin section can be removed when fitting the tack strip. Check the groove on a sample piece first, then repeat the same setting across the batch.
- Finish and sort the profiles. Remove rough edges that could interfere with assembly while keeping the sides’ dimensions and shape consistent. Group deep and medium frame sides separately, and pair matching pieces before fastening. This makes it easier to spot an incorrect profile before it becomes part of a complete frame.
- Fasten the sides without splitting them. For the guide’s frame assembly, use staples measuring 14 mm. Position each staple to secure the joint without breaking through the side. Test the setting on a prepared offcut, then inspect the finished sides for splits, proud staples and damaged grooves before adding them to frames.
British Standard National frame codes
Building your own beehive frames starts with matching the frame code to the hive box. Check the brood and super formats separately before preparing parts.
-
Check the British Standard National frame codes
Choose DN4 Hoffman frames for a conventional British National brood box. British National and WBC hives use British Standard DN frames in their standard brood boxes. The code identifies the frame type, whilst “Hoffman” describes a self-spacing side-bar design, not a frame size. Keep those terms distinct when selecting parts or planning a build.
A 14×12 frame is an extra-deep brood frame for a purpose-made 14×12 National or WBC brood box. A standard National brood box doesn’t take this frame. Standard National supers can sit above a 14×12 brood box, so the brood and super frame codes don’t always match.
-
Check frame tolerances and bee-space measurements
Measure the top-bar width against the frame type before cutting a batch. Common British Standard top bars are about 7/8 in (22 mm) wide for the narrow style, or 1 1/16 in (27 mm) for the wider style. Don’t substitute one width for another without matching the side-bar profile and intended spacing.
Compare assembled frames side by side and check that they sit evenly in the box. Hoffman side bars set spacing between neighbouring frames; straight side bars need a separate spacing method. This fit check can reveal inconsistent widths or profiles before you complete a batch.
- Distinguish National sizes from Commercial sizes. The British Commercial brood frame is commonly called 16×10, whilst its shallow super frame is commonly called 16×6. These codes describe different frame formats, not interchangeable National frames. Identify the hive type and box role first, then select matching parts. This avoids applying National dimensions to Commercial equipment.
- Work out the frame count from the box. There isn’t one frame count for every National brood box and super. Usable capacity depends on the box’s internal width and the chosen spacing system. Arrange the intended frames evenly, using Hoffman profiles or separate spacers to position them without crowding neighbouring frames. Factor the spacing method into your frame count.
- Confirm the full equipment combination. For building your own beehive frames, pair each brood-frame code with its brood box, then check which super will sit above it. A 14×12 brood box can take standard National supers, but the brood box itself must suit 14×12 frames. Explore British National hives and frames when matching equipment to your build.
BS Honey Bees: F1 Buckfast Queens
BS Honey Bees Ltd supplies F1 Buckfast Queens for beekeepers planning their next colony. Once your frames are ready, a queen or nucleus colony may be the next consideration when establishing or expanding an apiary. The range also includes Carniolan Queens and 5 / 6 Frame Nucs, giving you options for different colony plans.
Choose what fits your next step: a queen for a colony you're preparing, or a nuc when you need a nucleus colony. Building suitable frames addresses the equipment side; these products are for the bees you plan to keep in them.
Visit BS Honey Bees Ltd to explore the available beekeeping optionscolour.
Plan the next step for your apiary
Building your own beehive frames can help you prepare equipment for the hive format you keep. Before starting another batch, decide what your apiary needs next: compatible equipment, a queen for an existing colony or a nucleus colony. Match your choice to your space and management plans, so every frame has a place in your setup.
Keep a simple record of the frame code, timber profile and foundation method you chose. That makes it easier to repeat a successful build or spot what needs adjusting before making more. When you’re planning the bees to go with your equipment, BS Honey Bees offers F1 Buckfast Queens, Carniolan Queens and 5 / 6 Frame Nucs.
Choose the option that fits your plans, then take the next step at a pace that suits your apiary. Contact BS Honey Bees about your beekeeping plans and move your project forward with confidence.
Frequently Asked Questions
How many frames should you make at a time?
A batch of 10 frames is a practical starting point. It gives you a manageable run for preparing parts, assembling joints and checking consistency before repeating the process. Keep each batch grouped by hive type and frame code, rather than mixing formats on the workbench. If you’re making frames for more than one box style, finish and label one set before preparing the next.
How many pins do you need to nail a frame together?
Use eight pins to fix a frame together. Treat that as the pin count for the complete frame, not the number for each joint. Position the first pin securing a side bar to the top bar approximately 3 mm from the top. Nail choice and pattern can differ between methods, so don’t confuse the eight-pin recommendation with a separate guide’s count of 11 nails per frame.
What are the standard UK beehive frame dimensions for National, WBC, and Langstroth hives?
British National and WBC standard brood boxes use British Standard DN frames, and DN4 Hoffman is a common National brood-frame choice. Common British Standard top bars are 7/8 in (22 mm) or 1 1/16 in (27 mm) wide. A 14×12 frame needs a purpose-made brood box. Langstroth frames use a different format, so match their dimensions to the Langstroth box rather than applying National measurements.
How do you fit foundation and wire a beehive frame?
Feed wax foundation into the frame with its longer wire loops pointing down. Bend the long loop through 90 degrees so it sits flat beneath the top bar, then trap the loops under the foundation wedge. Secure that wedge with three gimp pins driven through the wedge and loops. Frame wiring adds strength, but isn’t essential; fit the wax carefully to avoid creasing or bending it.
What are the costs of DIY beehive frames compared with buying ready-made frames in the UK?
DIY costs depend on timber, foundation, fasteners and whether you already own suitable tools.