

A single loose nail or a slightly skewed side bar doesn't just make your hive look untidy; it risks a catastrophic collapse during your most critical mid-summer inspection. You've likely felt that surge of frustration when a frame pulls apart whilst covered in bees, or seen foundation buckle because it wasn't secured with precision. It's a common hurdle for every beekeeper, but following a professional beehive frame assembly guide can eliminate these risks. Mastering the British National standard is essential for a smooth-running apiary.
This guide ensures those days of equipment failure are behind you. We'll help you master the art of building professional-grade frames that remain square and sturdy for years. We'll clarify the confusion between DN4 and SN4 codes, provide a foolproof nailing sequence to prevent wood splitting, and show you how to fit foundation perfectly every single time. Get ready to build your next hive-worth of frames with absolute confidence and logistical excellence.
Key Takeaways
- Decode the nomenclature of British National standards to ensure you always select the correct DN4 or SN4 components for your hive.
- Organise a high-efficiency workspace using professional tools like cross-pane hammers and gimp pins for a seamless build process.
- Follow our comprehensive beehive frame assembly guide to master the "dry fit" and gluing techniques that prevent structural failure during inspections.
- Avoid common pitfalls such as timber-splitting over-nailing and forgetting the crucial glue joints that support heavy honey loads.
- Learn why sourcing knot-free, UK-standard timber is the foundation of a durable, square frame that lasts for years.
Understanding British National Frame Standards and Codes
The British National hive is the undisputed standard for beekeeping across the United Kingdom. Its modularity and widespread availability make it the practical choice for beginners and commercial operators alike. To manage these hives effectively, you must understand the British National beehive standards that dictate frame dimensions. Every component is designed to maintain the "bee space"; a precise gap of 6mm to 8mm that prevents bees from gumming up the works with propolis or wild comb. This precision is why a reliable beehive frame assembly guide is vital for any apiary.
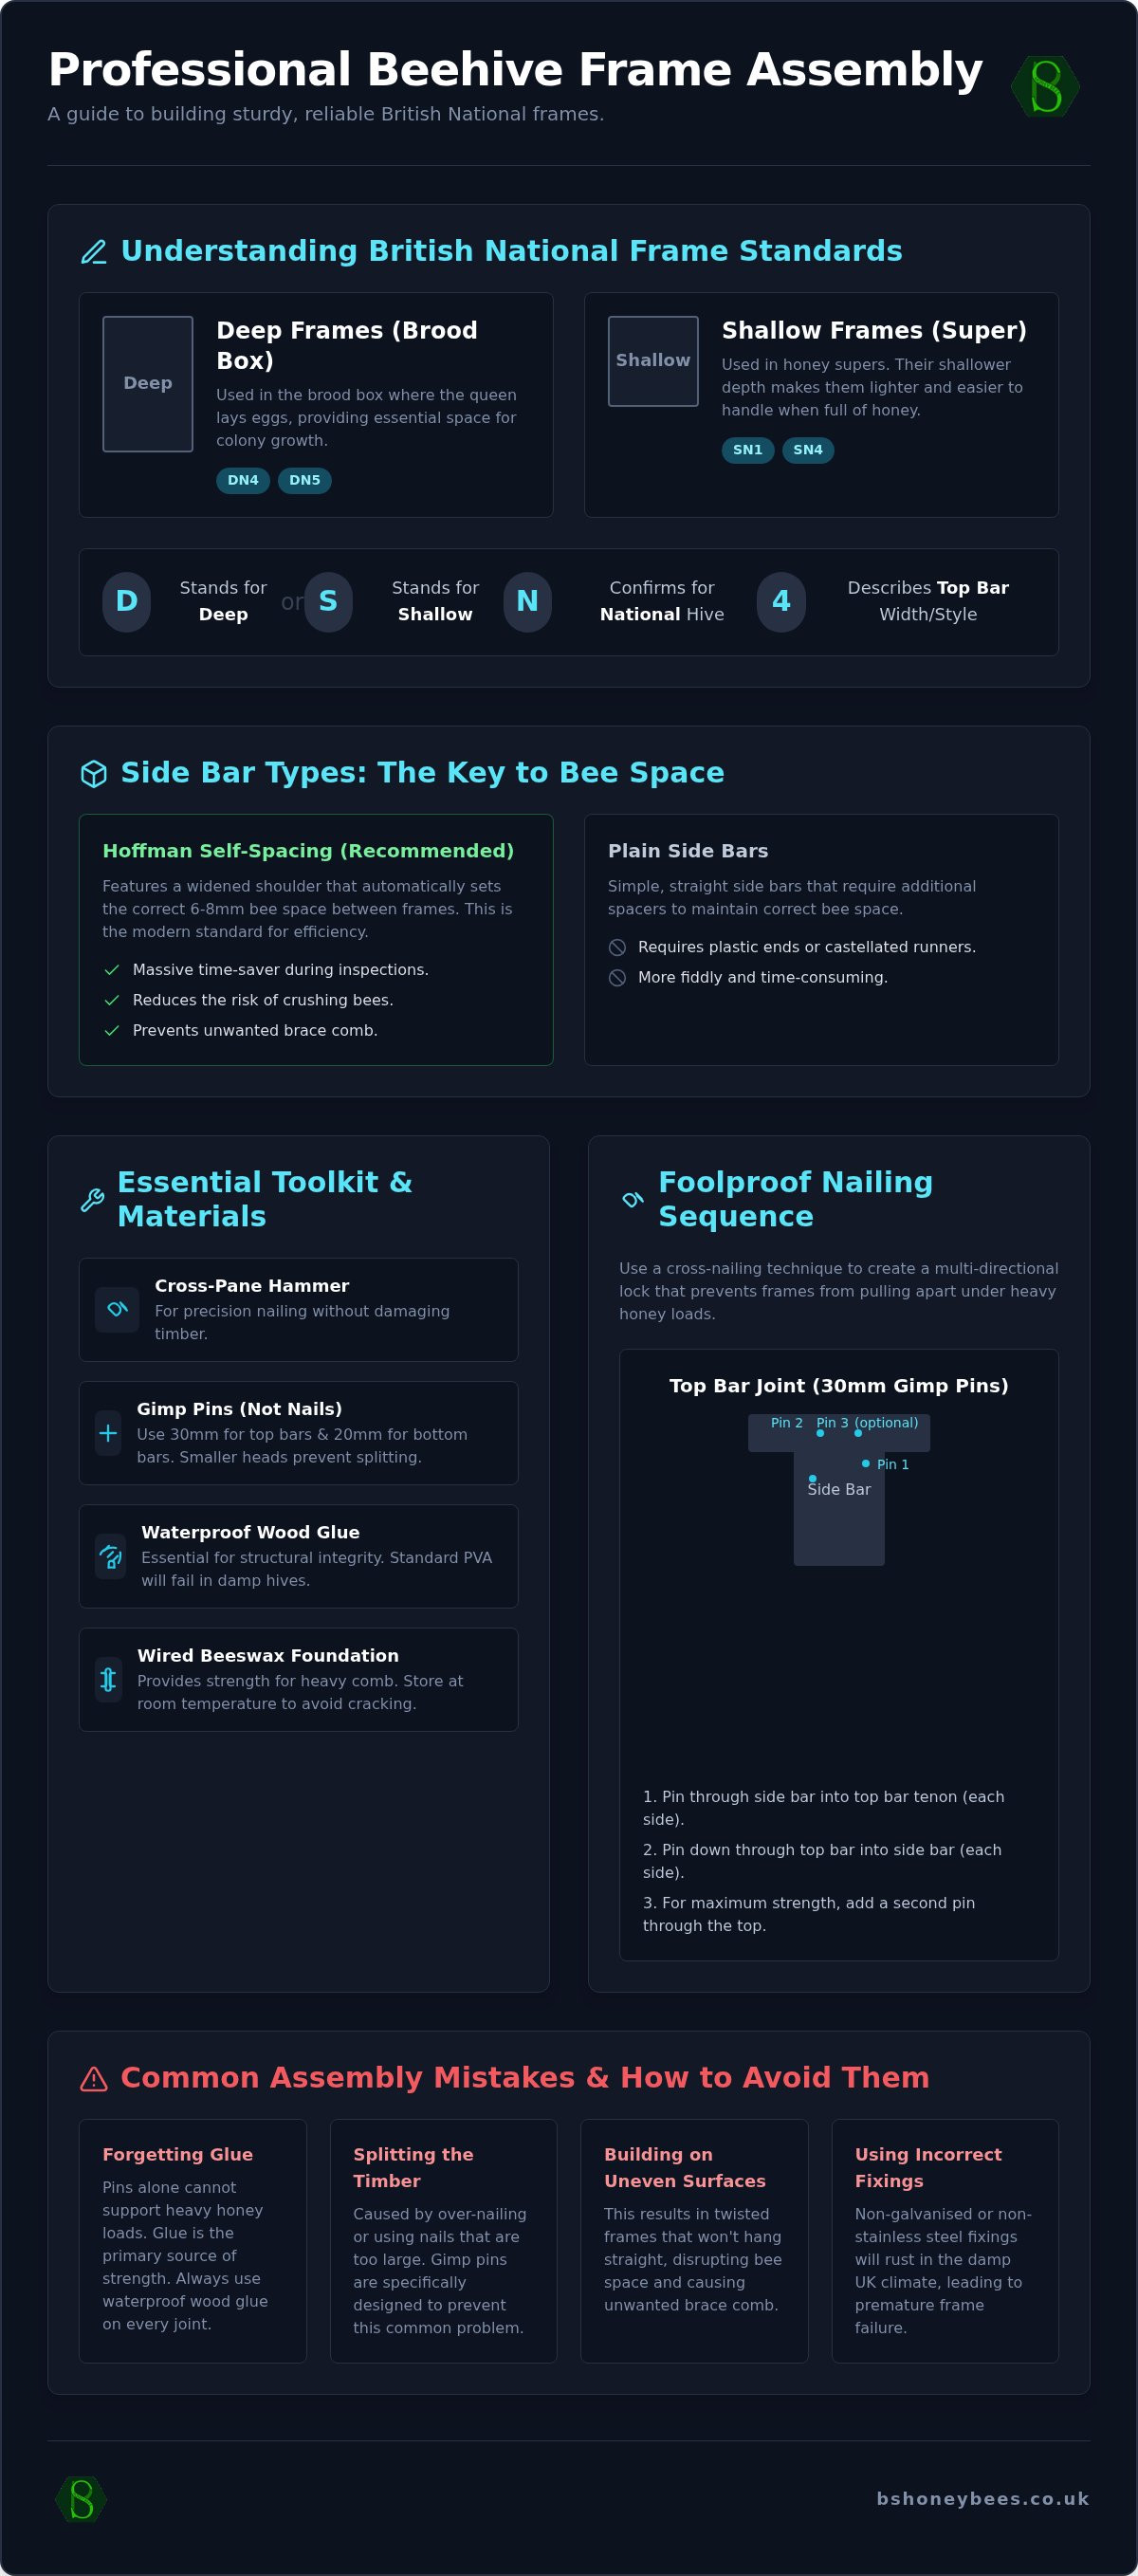
If you're looking at a catalogue, the codes can seem like a foreign language. It's actually quite simple. The first letter tells you the depth. "D" stands for Deep, used in the brood box where the queen lays her eggs. "S" stands for Shallow, used in the supers for honey storage. The "N" simply confirms it's for a National hive. The numbers that follow, like 4 or 5, describe the width of the top bar and the style of the side bar. For most hobbyists, DN4 and SN4 are the favourites. They offer the best balance of strength and ease of use for those just starting their journey.
Deep vs Shallow: Choosing the Right Size
Selecting the correct frame size is non-negotiable. DN4 and DN5 frames are built for the standard brood box. These provide the vertical space required for a healthy, expanding colony. If you're using a larger 14x12 brood box, a trend growing amongst UK beekeepers, you'll need the specific 14x12 frames instead. For your honey supers, SN1 and SN4 frames are the correct choice. These shallower frames are easier to handle when full of heavy honey. Matching these depths to your specific hive components ensures your bees have the right environment to thrive without wasted space.
Self-Spacing vs Plain Side Bars
The mechanics of your side bars define how you'll interact with the hive. Hoffman self-spacing side bars, found on DN4 and SN4 frames, feature a widened shoulder. This design ensures that every frame sits at the perfect distance from its neighbour. It's a massive time-saver. You won't need to fiddle with manual spacers whilst your bees are active. Plain side bars, like those on SN1 frames, are straight. These require external help, such as plastic ends or castellated runners in the hive box. Using Hoffman bars generally increases the speed of your inspections and reduces the risk of crushing bees. This beehive frame assembly guide focuses on these self-spacing models because they are the most efficient choice for modern beekeeping.
Essential Tools and Materials for Frame Building
Efficiency starts with organisation. If you're building fifty frames, you don't want to be hunting for a hammer every five minutes. Set up an assembly line on a flat, square workbench. This setup ensures your frames don't end up twisted. A twisted frame won't hang straight, which causes havoc with bee space and leads to unwanted brace comb. This beehive frame assembly guide prioritises structural precision from the first step.
Your toolkit is simple but specific. You need a small cross-pane hammer for precision work. Gimp pins are superior to standard nails; they have smaller heads that don't split the timber as easily. Most importantly, use waterproof wood glue. Standard PVA won't survive the damp conditions of a British winter. Glue provides the structural integrity that pins alone cannot offer, ensuring your equipment lasts for many seasons.
Selecting Your Foundation
In the UK, wired beeswax foundation is the gold standard for brood frames. It provides the strength needed when you're spinning honey or inspecting heavy colonies. Always check your codes before buying. A DN4 frame requires BS Deep foundation. If you're unsure about specific requirements, the British Beekeepers Association provides excellent resources on regional standards. Store your wax at room temperature. Cold wax becomes brittle and snaps easily whilst you're trying to slide it into the groove.
Nails and Fixings
Precision matters with your fixings. Use 30mm gimp pins for the top bar joints and 20mm pins for the bottom bars. I recommend a cross-nailing technique. Drive pins through the side bar into the tenon, then add one through the top bar. This creates a multi-directional lock that prevents the frame from pulling apart under the weight of honey. Use stainless steel or galvanised nails. Our climate is notoriously damp; rusted nails are a common cause of premature frame failure.
High-quality timber makes this process much smoother. You can find professional-grade British National frames that feature clean-cut joints to make your assembly line even more efficient.
Step-by-Step Guide to Assembling Your Beehive Frames
Precision assembly is the foundation of a manageable hive. Before reaching for the glue, perform a "dry fit" of your components. This allows you to check that the tenon joints are clean and fit snugly without forcing. If a joint is too tight, a quick pass with fine sandpaper is better than risking a split. A reliable beehive frame assembly guide ensures you don't skip this foundational check. A "wonky" or skewed frame creates uneven gaps that bees will inevitably fill with propolis or wild bridge comb, making your future inspections a struggle.
Applying glue to the tenon joints is the secret to longevity. Whilst pins provide the initial grip, the glue creates a permanent bond that withstands the weight of ten kilograms of honey and the heat of the brood nest. Use a small brush to apply a thin, even layer of waterproof adhesive. Excess glue should be wiped away immediately with a damp cloth to keep the timber clean and professional.
Constructing the Timber Skeleton
Step 1: Apply glue to the top bar tenons and connect the side bars. Ensure they seat fully into the shoulders. Drive a 30mm gimp pin through the top of the side bar into the lug. Step 2: Check for squareness against the edge of your workbench. Your side bars must be perfectly perpendicular to the top bar. If they aren't, the frame will hang at an angle, crushing bees against the hive wall. Step 3: Attach the first bottom bar. This creates a stable "U" shape. It provides the necessary structure to house the foundation without the wax slipping or buckling during the next phase of the build.
Fitting the Foundation and Wedge
Step 4: Carefully slide your wired beeswax foundation into the grooves of the side bars. It should glide smoothly until the top edge sits flush against the top bar. Step 5: Securing the top is a specific feature of the British National design. Use the removable timber wedge. Place it over the top of the wax, ensuring the wire loops are trapped firmly beneath it. Drive three gimp pins horizontally through the wedge into the top bar to lock the foundation in place. Step 6: Finally, attach the second bottom bar to "sandwich" the wax at the base. Pin through the bottom bars into the side bars at a slight angle to complete the assembly. Your frame is now a rigid, professional-grade unit ready for your bees.
Common Assembly Mistakes and How to Avoid Them
Even with the best intentions, small technical errors can compromise your equipment. A comprehensive beehive frame assembly guide must address these pitfalls before they occur in the workshop. One of the most frequent mistakes is over-nailing. You might think six pins are better than four, but too many fixings create a perforation line along the grain. This weakens the timber, making it prone to splitting under stress. Stick to the recommended nailing pattern to maintain structural integrity. Precision is always superior to force.
Forgetting the glue is another critical error that often goes unnoticed until it's too late. Whilst a pinned frame feels sturdy when empty, it's the glue that carries the load during a heavy honey flow. Without it, the bottom bars can pull away when you're prying the frame from the hive. Orientation also matters. When assembling Hoffman frames, ensure the side bars are positioned correctly. The "V" edge of one side must face the opposite direction to the "V" on the other. This ensures that when frames are placed in the hive, a "V" edge always meets a flat edge. Getting this wrong during assembly ruins your consistent bee space and leads to a propolis-heavy hive that is difficult to manage.
Preventing Wood Split
Splitting is a common frustration when working with thin cedar or pine components. To prevent this, blunt the tip of your gimp pins with a light hammer tap before driving them in. This simple trick allows the nail to crush through the wood fibres rather than acting as a wedge that pries them apart. Always drive pins at a slight inward angle when securing side bars to the top bar. If a joint feels loose, don't just add more nails. Use a high-quality waterproof glue to fill the gap and provide the necessary bond. This ensures your frames remain square and functional for years.
Foundation Buckling Issues
Foundation buckling often occurs because the wax has no room to move. Beeswax is a natural material that expands whilst in the heat of a summer hive. If you "pinch" the foundation too tightly between the bottom bars, the wax will bow or buckle as it warms up. Leave a millimetre of breathing room at the base. You should also be wary of using old foundation that has developed a white, powdery bloom. Bees often reject aged wax, leading to poor comb development. Fresh, aromatic foundation is always the better choice for a productive colony.
Avoid the frustration of equipment failure by choosing high-quality components. Buy your British National frames from a specialist who understands the precision required for successful beekeeping.
Sourcing Quality Frames and Foundation for 2026
Efficiency in your workshop is dictated by the quality of your raw materials. High-quality, knot-free timber is essential for a smooth assembly process. Knots in the wood aren't just an aesthetic issue; they create weak points where the grain can twist or split under the pressure of a gimp pin. When you follow a professional beehive frame assembly guide, you'll find that precision-milled components save hours of frustration. Using inferior timber often leads to frames that aren't square, which compromises the delicate balance of your hive management.
Winter is the ideal season to prepare your equipment. Building your frames whilst the bees are clustered ensures you're ready for the first spring inspection without a last-minute rush. This proactive approach allows the glue to cure fully in a dry environment. These frames are designed for seamless integration into British National beehives, ensuring that every box you add maintains perfect bee space across your entire apiary.
The BS Honey Bees Quality Guarantee
We provide hardware designed specifically for the rigours of the UK climate. Our frames feature precision-cut tenon joints that offer a snug, professional fit every time. This logistical excellence means you spend less time fixing mistakes and more time managing your colonies. To give your new equipment the best possible start, consider pairing your fresh frames with premium mated queen bees UK. Our nationwide delivery service ensures your apiary is fully equipped and ready for action well before the nectar flow begins.
Ordering in Bulk for the Apiary
Managing multiple colonies requires a disciplined approach to inventory. Buying frames and foundation in packs of 10 or 50 is the most cost-effective way to scale your operations. This ensures total compatibility across all your equipment, including any honey bee nucs for sale UK you might be introducing this season. Using a single beehive frame assembly guide for all your builds creates a uniform standard across your hives, making inspections faster and more predictable.
Ready to upgrade your equipment for the 2026 season? View our full range of National Frames and Foundation and secure professional-grade hardware for your bees today.
Equip Your Apiary for Professional-Grade Success
Mastering the British National standard is about more than just building boxes; it's about ensuring the long-term health and productivity of your colonies. By decoding frame codes and adopting a disciplined assembly line approach, you've taken a significant step toward smoother, more efficient inspections. This beehive frame assembly guide provides the technical blueprint you need to avoid common pitfalls like wood splitting or foundation buckling.
Remember that waterproof glue and precise pinning are non-negotiable for frames that must carry heavy honey loads. Sourcing high-quality, knot-free timber ensures your workshop time is productive and results in square, sturdy frames that last for years. As a specialist UK bee breeder, BS Honey Bees Ltd offers the professional-grade equipment you need to excel. Our nationwide delivery service ensures you're prepared well before the nectar flow starts. Shop Premium British National Frames and Foundation at BS Honey Bees and build with absolute confidence. Your bees deserve the best start possible. Get your workshop organised and enjoy the satisfaction of a job well done.
Frequently Asked Questions
Do I really need to use glue when assembling beehive frames?
Yes, waterproof wood glue is essential for long-term structural integrity. While nails provide the initial hold, the glue carries the weight of heavy honey crops that can reach ten kilograms per box. Without a glued joint, the bottom bars are prone to pulling apart during inspections when prying frames from the hive. Use a high-quality PVA glue to ensure your equipment survives the damp British winter and the heat of the summer brood nest.
What is the difference between DN4 and DN5 National frames?
The primary difference is the width of the top bar. DN4 frames feature a standard 22mm top bar, while DN5 frames have a wider 27mm top bar designed to reduce the amount of bridge comb bees build between boxes. Both types utilize Hoffman self-spacing side bars. Most UK hobbyists prefer the DN4 standard as it's the most widely compatible option for British National brood boxes and provides a familiar handling experience during colony management.
How many nails should I use per frame?
Use exactly six gimp pins to secure a standard National frame effectively. Drive two 30mm pins through the top bar into the side bars to create a strong primary joint. Add two 20mm pins into the bottom bars to secure the base. Finally, use two pins to fix the removable wedge that holds the foundation in place. This beehive frame assembly guide recommends this specific pattern to provide maximum strength without over-nailing, which can split the timber.
Can I assemble frames without a specialised frame-building jig?
Yes, you can assemble frames perfectly well on any flat, square surface. While a jig is helpful for bulk assembly of fifty or more frames, a steady hand and a square workbench are sufficient for smaller batches. Focus on ensuring the side bars remain perpendicular to the top bar throughout the process. Use the edge of your table as a guide to keep every component aligned whilst the glue sets, ensuring your frames hang straight in the hive.
Which way up does the foundation go in a National frame?
The foundation sheet should be oriented so the wire loops or hooks are at the top. These loops are designed to be trapped firmly behind the removable timber wedge in the top bar. If you examine the hexagonal cells, the "Y" shape inside the cell should be upright. Correct orientation ensures the bees build their comb naturally and the wax remains securely anchored under its own weight, preventing the foundation from sagging or slipping out of the grooves.
How do I stop my beehive frames from splitting when I nail them?
Blunt the tip of your gimp pins with a hammer before driving them into the wood. This simple technique causes the nail to crush through the wood fibres instead of acting like a wedge that pries them apart. It's particularly useful when working with thin cedar or pine side bars. Always aim to nail at a slight angle towards the centre of the joint. This provides a more secure, split-free finish that maintains the structural integrity of your timber.
What is Hoffman spacing and do I need it for my frames?
Hoffman spacing refers to side bars with widened shoulders that automatically create the correct 35mm gap between frame centres. This design eliminates the need for plastic ends or manual spacers. Following a beehive frame assembly guide that utilizes Hoffman frames simplifies hive management significantly. It allows you to slide frames along the runners quickly without crushing bees or losing the precise 6mm to 8mm bee space required for a healthy, productive colony.
Should I buy wired or unwired foundation for my supers?
Choose wired foundation for your supers if you plan to use a centrifugal honey extractor. The internal wires provide the structural support needed to prevent the wax from shattering under high-speed rotation. Unwired foundation is only suitable for cut comb honey, where the wax is sliced directly from the frame for consumption. For most UK beekeepers, wired foundation is the more versatile and durable choice, ensuring your frames can be reused for multiple seasons of honey production.