

What if your very first hive inspection felt less like a frantic battle against thousands of stings and more like a calm, organised check-in with a thriving partner? Most new beekeepers feel a sharp rush of adrenaline and a fair bit of dread when they first approach their new colony. It's completely normal to worry about missing the queen or accidentally upsetting the hive's delicate balance. Mastering how to inspect a new nuc of bees is the essential first step toward becoming a confident, successful apiarist.
This guide will teach you how to conduct a professional-standard inspection whilst ensuring you choose a colony bred for a gentle temperament. You'll gain the skills to identify healthy brood patterns and locate the queen without the usual stress. We will explore the vital differences between overwintered and spring nucs, explain what those white 2026 queen markings signify, and provide a clear roadmap for your colony's first few weeks. By the end, you'll have the expertise to turn that initial anxiety into a productive, lifelong passion for beekeeping.
Key Takeaways
- Learn why the 'Golden Rule' of waiting seven days after transfer is critical to prevent your queen from absconding or balling.
- Discover how to inspect a new nuc of bees with confidence by selecting F1 Buckfast colonies bred specifically for their calm and gentle temperament.
- Identify the essential kit required for a safe start, from professional-grade BBWear suits to mastering the use of cool, white smoke.
- Master the 'First Gap' technique to create working space and learn exactly where to stand to avoid disrupting the colony's flight path.
- Understand the '70% Rule' to determine the precise moment your thriving nuc is ready to expand into a full British National hive.
When to Perform Your First Nuc Inspection
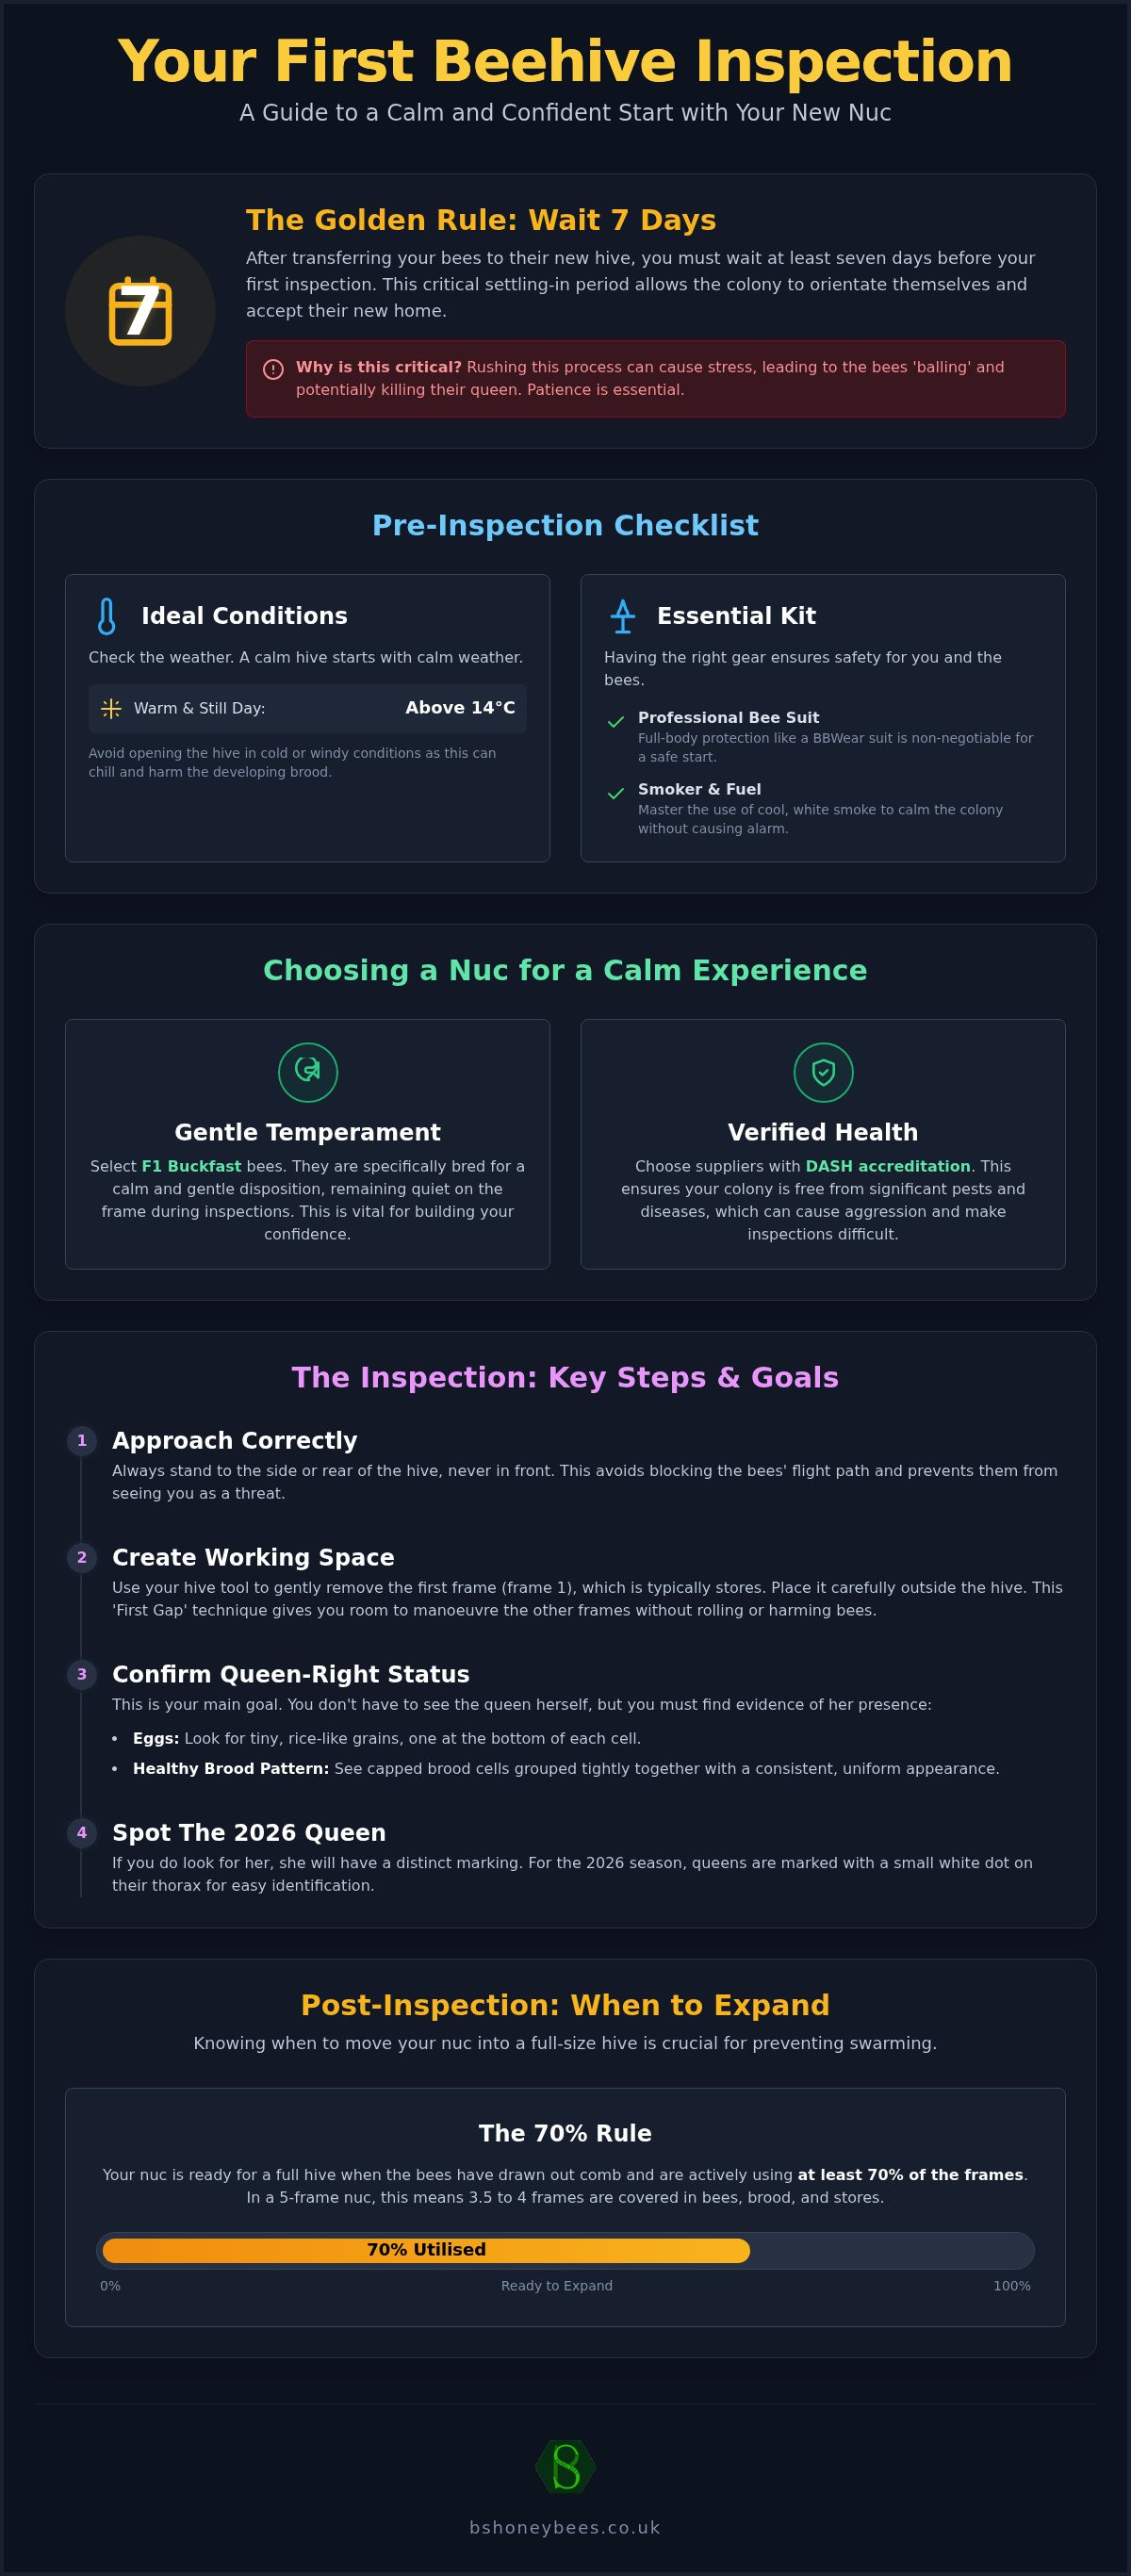
Patience is the most valuable tool in a beekeeper's kit. The golden rule for any new arrival is to wait at least seven days after you have transferred your bees into their permanent hive. This settling period allows the nucleus colony to orient to their new surroundings and reorganise their internal structure. Rushing this process is a common beginner mistake; it often leads to queen balling, a defensive behaviour where the workers cluster tightly around the queen and potentially kill her due to perceived stress. Mastering this initial timing is the essential first step in learning how to inspect a new nuc of bees safely.
Before you even reach for your smoker, observe the hive entrance. If you see workers returning with heavy pollen loads on their legs, it's a positive indicator that the colony is already feeding brood and the queen is active. You should only proceed with the inspection on a warm, still day where temperatures exceed 14°C. Opening a hive in cold or windy conditions risks chilling the delicate larvae, which can stall the growth of your colony for several weeks. A calm atmosphere outside the hive usually mirrors a calm temperament inside.
The Impact of Transport on Inspection Timing
The method of delivery dictates how long you should wait. Posted nucs in Correx boxes endure significant vibration and temperature fluctuations during transit; they require the full seven-day window to recover their composure. If you opted for a Gloucester collection, your bees have had a much smoother journey. They still need a few hours of flight time to find their bearings before you consider an intervention. Watch for signs of stress behaviour, such as bees crawling aimlessly on the hive front or an unusually high-pitched buzz. If the colony appears agitated, postpone your plans for another twenty-four hours to ensure a calm experience.
Setting a 2026 Inspection Schedule
Your calendar will look different depending on which nuc type you chose. Overwintered nucs arriving in April 2026 are often bursting with bees and may require a check sooner than later to prevent swarming. Spring nucs delivered in May or June are in a phase of rapid expansion and will need consistent monitoring to ensure they don't run out of space. When you do open the hive, look for the white marking on your 2026 queen to locate her quickly amongst the frames. Confirming queen-right status, defined as the presence of a healthy and actively laying queen, is the primary goal of your first inspection. Following this structured approach ensures you understand the fundamental technique of how to inspect a new nuc of bees without compromising the health of your new livestock.
Choosing the Right Nuc for a Smooth Inspection Experience
Your choice of colony determines whether your first attempt at learning how to inspect a new nuc of bees is a calm success or a stressful struggle. Understanding Beekeeping Basics involves recognising that genetics dictate hive behaviour. F1 Buckfast bees are the gold standard for beginners because they are bred for an exceptionally gentle temperament. These bees remain quiet on the frame whilst you work, allowing you to observe the queen and brood without facing a cloud of defensive workers. This predictable behaviour is vital for building your confidence during those first critical weeks.
Health standards are another non-negotiable factor. Always prioritise suppliers with DASH accreditation who exceed APHA guidelines. This status confirms the colony has undergone rigorous health checks and is free from significant pests or diseases. A healthy colony is naturally more settled; conversely, a hive struggling with varroa mites or disease will often exhibit high levels of aggression. By starting with a high-standard nuc, you eliminate one of the biggest variables that can make inspections difficult for a novice.
The physical format of your nuc also plays a role in your management strategy. A 5-frame British National nuc is the functional choice for nationwide delivery, providing a compact and established unit. However, if you are collecting from Gloucester, a 6-frame Poly Nuc offers a premium alternative. These units provide superior insulation, which keeps the brood at a stable temperature and ensures the bees remain relaxed. If you want the best possible start, you might view our range of F1 Buckfast queens and colonies to see which suits your apiary setup.
Overwintered Nucs: The Early Season Advantage
Overwintered nucs are colonies that have already survived a UK winter with their queen. They are highly established and ready for rapid expansion as soon as they arrive in April. Because the colony is already a cohesive unit, their behaviour is more predictable when you are learning how to inspect a new nuc of bees. Be prepared for their speed; a 6-frame overwintered colony can fill a full hive in weeks. These premium colonies are in high demand and often sell out by October for the following 2026 season, so forward planning is essential.
Spring Nucs: Perfect for Learning the Ropes
If you prefer a slower pace, a Spring nuc delivered in May or June is an excellent choice. These colonies are usually provided in a 5-frame Correx transport box and offer a steady growth curve. This gradual build-up allows you to practice your inspection techniques as the bee population increases naturally. It's a fantastic way to develop your eye for spotting eggs and larvae without being overwhelmed by a massive workforce. To get started with your own colony, you can Secure your 2026 Nucleus Colony today and begin your beekeeping journey with confidence.
Essential Kit for Your First Inspection
Confidence in the apiary starts with the quality of your equipment. Whilst a gentle F1 Buckfast colony reduces the risk of defensive behaviour, a beginner's peace of mind depends on knowing their protective gear is impenetrable. Professional-grade BBWear bee suits are the industry standard for a reason; they provide robust protection without sacrificing the mobility you need to handle delicate frames. Before you begin learning how to inspect a new nuc of bees, ensure your kit is organised and within easy reach. Fumbling for a tool mid-inspection creates unnecessary vibrations that can agitate the colony.
Your hive tool is your primary lever for lifting frames that the bees have sealed with propolis. For nucleus colonies, many beekeepers prefer the J-type tool because the hook allows for a controlled, vertical lift that minimises the risk of rolling bees on adjacent frames. Traditional flat patterns are equally effective for scraping clean the tops of frames. Regardless of your choice, keep a dedicated apiary notebook or a digital first inspection checklist to record your findings. Documenting the presence of eggs, the temperament of the bees, and the state of food stores in 2026 will help you track the colony's progress and identify trends over time.
Protective Gear and Personal Safety
Total coverage is essential for those new to the craft. Opt for a full bee suit rather than a jacket to eliminate the risk of bees crawling up your waist. Cleanliness is just as vital as protection. Always use clean, dedicated gloves for each session to prevent the cross-contamination of bee diseases between hives. Organise your workspace before you crack the seal of the hive. A calm, methodical approach prevents the frantic movements that often trigger a defensive response from the colony.
Preparing Your Smoker and Fuel
The smoker is your most effective tool for communication. It works by masking the alarm pheromones that bees release when they feel threatened. To produce the required cool, white smoke, use natural fuels like dried pine needles, hessian, or specialised smoker pellets. Avoid any materials with synthetic fibres or chemicals. Use the 'puff' technique: a few gentle puffs at the entrance and a light application under the crown board is usually sufficient. Your smoker must stay lit throughout the entire process. A smoker that goes out halfway through is a common hurdle when mastering how to inspect a new nuc of bees, so practice your lighting technique until it becomes second nature.
Step-by-Step: Your First Seven-Day Nuc Inspection
Approaching the hive for the first time requires a blend of focus and physical discipline. Position yourself at the side of the hive, never directly in front of the entrance. Standing in the flight path blocks returning foragers, which creates a backlog of confused bees and can quickly escalate the colony's defensive response. Whether you are working with a 5-frame posted nuc or a 6-frame unit collected from Gloucester, this side-on approach is the foundation of how to inspect a new nuc of bees safely. Once you have applied a few gentle puffs of smoke, remove the crown board with care to avoid sudden vibrations.
The 'First Gap' technique is your best defence against accidental bee mortality. Start by removing the outermost frame, which is usually frame one or the final frame in the box. This frame typically contains food stores rather than the queen, making it the safest to move. By setting this frame aside in a frame rest or a clean 2-in-1 poly nuc box, you create a working gap. This space allows you to slide the remaining frames sideways before lifting them, effectively eliminating the risk of 'rolling' the queen or crushing workers between the sidebars. Always hold frames vertically over the hive body; tilting them horizontally can cause heavy nectar or unsealed larvae to fall out of the cells.
What to Look For: The Checklist
Your primary objective is to confirm the colony is 'queen-right' and healthy. Look for eggs at the base of the cells; they are tiny, white, and shaped like a grain of rice. If you see eggs, you know the queen was present within the last three days. Next, inspect the larvae. Healthy larvae should be a 'pearly white' colour and curled in a C-shape. Check the capped brood for a solid, consistent pattern with biscuit-coloured cappings. Finally, ensure the colony has sufficient resources. A thriving nuc should have a 'halo' of glistening nectar and colourful pollen surrounding the central brood area, providing immediate food for the developing bees.
Queen Identification and Safety
Spotting the queen amongst thousands of F1 Buckfast workers is significantly easier when she is marked. At BS Honey Bees, all queens for the 2026 season are marked with a distinct white dot, following the international colour code. Don't panic if you cannot find her on your first attempt. If you have identified fresh eggs and the bees are behaving calmly, the colony is almost certainly queen-right. If you do spot her, observe her movement briefly to ensure she is active, then move on to the next frame to minimise her time out of the dark. To ensure you start with these high-quality genetics, you can order your 2026 nuc from our DASH-accredited apiary today.
Post-Inspection: Scaling Your Nuc into a Full Hive
Once you have mastered how to inspect a new nuc of bees and confirmed your colony is healthy, your focus shifts to expansion. Managing the transition from a small nuc box to a full British National hive is a critical phase in establishing a productive colony for the 2026 season. The '70% Rule' serves as your primary indicator for adding space. When you observe that seven out of the ten frames in your hive body are densely covered in bees, it's time to provide more room. Providing this space too early can lead to heat loss, whilst waiting too long may trigger the swarm instinct in a crowded box.
Supporting your bees during this growth phase often requires supplemental feeding. Drawing out new wax foundation is an energy-intensive process for worker bees. Unless there is a heavy natural nectar flow, providing a 1:1 sugar syrup helps the colony build comb rapidly and securely. This investment in the early weeks ensures the hive has enough storage space for the upcoming honey flow. A well-managed nuc that expands efficiently in May is far more likely to produce a surplus of English honey by late summer.
Moving from Nuc to National Hive
Maintain the integrity of the brood nest during the transfer. Keep the frames from the nuc in their original order and place them in the centre of the new hive body. Flank these frames with fresh foundation and use dummy boards to reduce the internal volume of the hive. This technique keeps the cluster warm and focused on the central brood area. Different breeds expand at different rates; understanding the nuances of Buckfast vs Carniolan Bees will help you predict how quickly your specific colony will require additional room.
Securing Future Success
Monitor the colony's progress weekly. When the bees have drawn out and occupied the majority of the frames in the brood box, you must decide whether to add a second brood box or a honey super. High-vigour overwintered nucs are particularly prone to rapid spring expansion and require vigilant monitoring for swarm cells. If you see queen cells being built along the bottom of the frames, you must take immediate action to manage the swarm impulse. By staying ahead of the colony's needs, you ensure your bees remain productive and settled. To secure your start for the coming season, you can Browse our 2026 Overwintered and Spring Nucs and choose a colony bred for excellence. Learning how to inspect a new nuc of bees is only the beginning; the real reward is watching that small colony grow into a thriving, honey-producing hive.
Start Your 2026 Beekeeping Season with Confidence
Mastering how to inspect a new nuc of bees is a skill that transforms a nervous beginner into a capable, confident apiarist. By respecting the seven-day settling period and choosing a colony with a gentle temperament, you ensure your first steps in the apiary are safe and productive. Always look for the pearly white larvae and that distinct white 2026 queen marking to confirm your hive's health and queen-right status before you begin scaling up your colony.
As a DASH Accredited Specialist, BS Honey Bees provides the high standards and logistical excellence you need for a stress-free start. Our nationwide delivery every Thursday ensures your bees arrive in peak condition, ready to expand into a full British National hive. We prioritise the success of our customers by supplying only the highest quality F1 Buckfast and Carniolan genetics, ensuring your bees remain calm on the frame whilst you work.
Ready to begin your journey? Secure Your 2026 Nucleus Colony – Order Online Today. Beekeeping is a deeply rewarding pursuit; with the right bees and a methodical approach, your first season will be the foundation of a thriving, productive apiary.
Frequently Asked Questions
How soon can I inspect my bees after they arrive by post?
You should wait at least seven days after transferring your bees into their permanent hive before conducting a full inspection. This settling period is vital for posted nucs to recover from the stress of transit and orient to their new environment. Opening the hive too early can lead to the queen being balled or absconding. Use this week to observe entrance activity and ensure they are bringing in pollen whilst they settle.
What if I can't find the queen during my first inspection?
Don't panic if you cannot locate the queen on your first attempt, provided you can see fresh eggs. Eggs at the base of cells confirm she was present within the last three days. Spotting the queen is a specific skill that develops with time, but finding eggs is a reliable indicator of a queen-right status. If you see eggs and the bees are calm, conclude the inspection to minimise disturbance to the colony.
Do I need to feed my new nuc of bees straight away?
Yes, feeding your new nuc with a 1:1 sugar syrup is highly recommended to help them draw out new wax foundation. This is particularly important if there isn't a strong natural nectar flow or if you have installed them on fresh foundation. Providing this energy boost allows the colony to expand rapidly into the full hive body. Monitor their stores weekly and stop feeding once they have drawn out most of the frames.
What colour will the queen be marked in 2026?
All queens for the 2026 season will be marked with a white dot, which is the international standard colour for years ending in 1 or 6. This marking makes it significantly easier to identify her amongst the workers. Learning how to inspect a new nuc of bees is much simpler when the queen is clearly marked, as it reduces the time the hive remains open and helps prevent accidental chilling of the brood.
Is it normal for bees to be 'boiling over' the top of the nuc frames?
Seeing bees 'boiling over' the top bars is a sign of a strong, healthy population that is ready for more space. This often happens with overwintered nucs that arrive in April. If you see this level of congestion, you must transfer them to a full hive body immediately. Use your smoker to gently push the bees down between the frames so you can work without accidentally crushing them during the transfer.
What should healthy bee brood look like in a new nuc?
Healthy brood should appear as 'pearly white' larvae curled in a C-shape at the base of the cells. The capped brood should have a consistent, solid pattern with dry, biscuit-coloured cappings that are slightly domed. Avoid colonies with patchy brood patterns or sunken, dark cappings, as these can be indicators of disease or a failing queen. A thriving nuc will show brood in all stages of development during your check.
How often should I inspect my bees during the first month?
You should inspect your bees once every seven to ten days during the first month. This frequency allows you to monitor their expansion and check for the presence of eggs without causing excessive stress to the colony. Frequent inspections can disrupt the hive's temperature and humidity, potentially stalling growth. Use your apiary notebook or a digital record system like beekeeperscolony.com to record the progress of how to inspect a new nuc of bees as they draw out new frames.
Can I transfer my nuc into a Langstroth hive if it's on National frames?
You cannot directly transfer a National nuc into a Langstroth hive because the frame sizes are incompatible. National frames are smaller and won't fit the Langstroth box without significant modification or the use of an adaptor. We recommend using British National Hives for our nucs to ensure a seamless fit. If you must switch, you will need to use a 'shook swarm' technique or specialised conversion equipment to move the colony.