

You don’t need to move a colony straight onto entirely new comb to renew its brood nest. To do a Bailey comb change, place a clean brood box with starter foundation above the existing brood box in early spring, then encourage the bees to draw fresh comb. Manage the queen’s move into the upper box and remove the old brood box after three weeks.
Replacing old brood comb is a practical part of hive hygiene, but it takes careful timing and monitoring. This guide explains how to prepare the boxes, encourage comb-drawing, and confirm the queen is laying in the new comb before separating the brood boxes. It also covers what to consider if the colony is weak and how to manage space after the change.
Key Takeaways
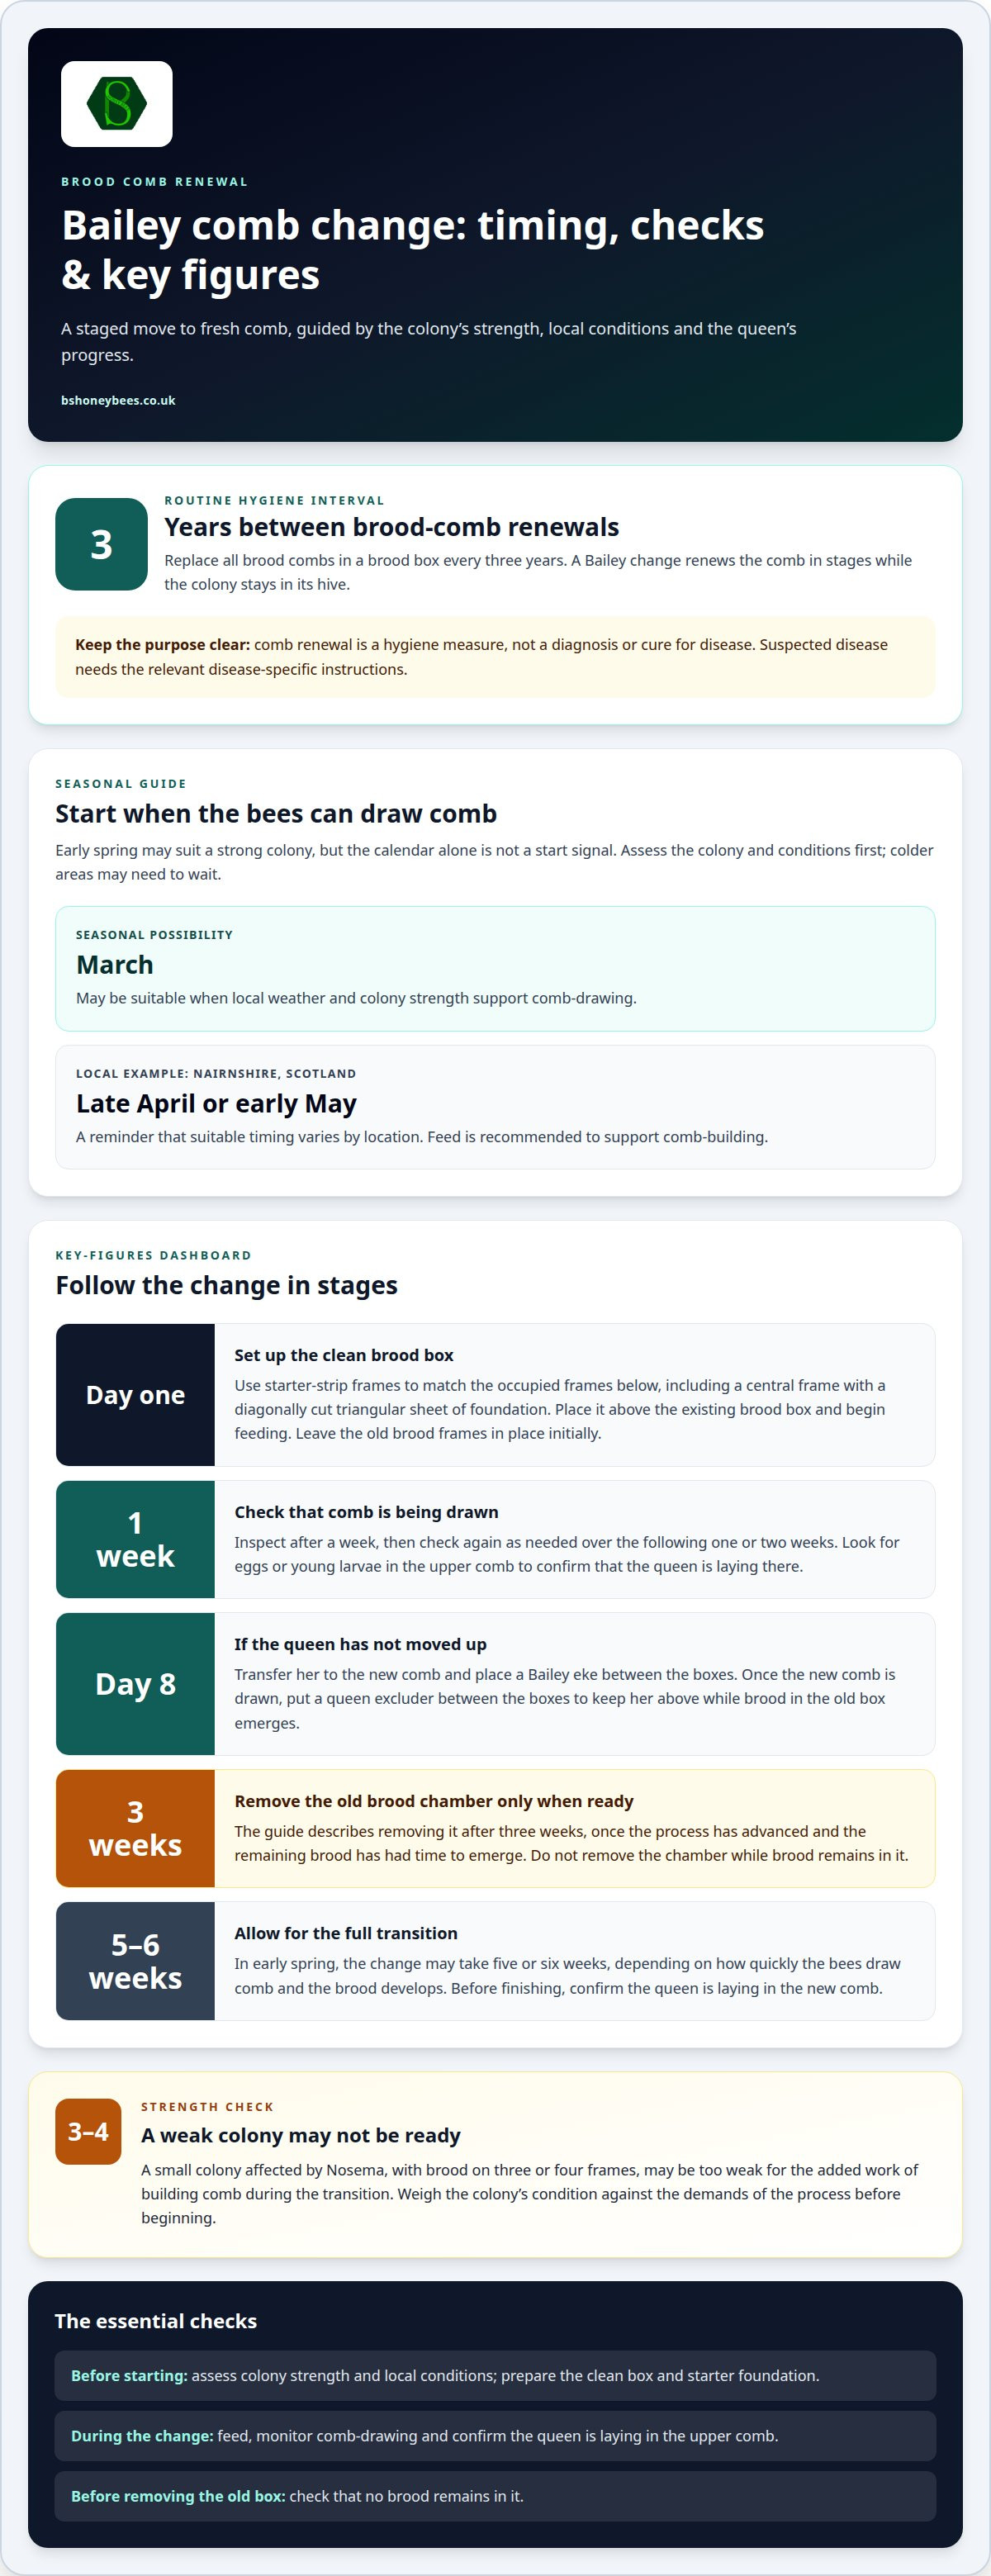
- Plan the change for early spring, when the colony can build new comb, and assess its strength before starting.
- Use the method to replace old brood comb as part of routine hive hygiene, rather than treating it as a fix for every colony.
- Track the queen’s move into the upper box and use the right checks to keep her with the new comb.
- Manage feeding and available space after the change to support comb-building and help limit congestion.
- Prepare the clean brood box, starter foundation and other equipment before beginning, so each step can proceed smoothly.
Why Undertake A Bailey Comb Change?
- For a healthy colony, choose early spring, when conditions support the bees in drawing fresh comb. March may be suitable, but the weather and colony strength determine when to begin. In colder parts of the UK, wait until the bees can work the new foundation effectively. Don’t start just because the calendar says spring; assess the colony and conditions first.
- Check the colony’s strength before you begin. A Bailey change asks the bees to build comb while maintaining brood through a transition. A small colony affected by Nosema, with brood on three or four frames, may be too weak to manage that added work. Weigh the colony’s condition against the demands of the process rather than treating comb renewal as an automatic task.
- A Bailey change renews old brood comb while keeping the colony together. Unlike a shook-swarm approach, which transfers bees to a clean hive and leaves the old comb behind, the Bailey method moves the colony between boxes in stages. The bees draw replacement comb above the old brood nest before you remove the old chamber.
- Prepare a clean brood box with starter-strip frames to match the occupied frames below, including a central frame with a diagonally cut triangular sheet of foundation. On day one, place it above the existing brood box and begin feeding. Leave the old brood frames in place initially so the queen and workers can move up as the new comb is drawn.
- Check whether the bees are drawing comb after a week, then inspect again as needed over the following one or two weeks. If the queen has not moved up by day eight, transfer her to the new comb and place a Bailey eke between the boxes. Once the comb is drawn, put a queen excluder between the boxes to keep her above while the brood in the old box emerges.
- Give the transition time to run its course. In early spring, a Bailey comb change may take five or six weeks, depending on how quickly the bees draw comb and the brood develops. Remove the old brood chamber after three weeks, once the process has advanced and the remaining brood has had time to emerge. Don’t remove it while brood still remains in the old box.
- Before finishing, confirm the queen is laying in the new comb and that the old brood chamber can be removed. Common mistakes include starting with a colony too weak for the work, losing track of the queen, and removing the old box too soon. Replacing brood comb every three years is a routine hygiene measure; time the change to suit the colony’s readiness.
March is considered a suitable month for a Bailey comb change, and feeding is recommended to help the bees build comb. Treat this as seasonal guidance, not a fixed start date: local conditions vary. Choose when to begin based on whether the colony can draw the new comb.
In Nairnshire, Scotland, a typical start is late April or early May. This local example shows why there is no single start date for every location. Use seasonal guidance alongside the colony’s readiness, and provide feed to support comb-building during the change.
Purpose and hygiene benefits of the Bailey comb change
For routine apiary hygiene, replace all brood combs in a brood box every 3 years. This is a practical comb-renewal recommendation; suspected disease needs attention to the relevant disease-specific instructions, not comb replacement alone.
- A Bailey change renews brood comb in stages while the colony remains in its hive. The bees draw replacement comb in a clean brood box, creating a fresh laying area for the queen. This approach lets you replace old comb without moving the colony onto a completely new set of frames all at once.
- Consider the age and condition of each brood frame before you begin. Repeated brood cycles leave comb darker and add cocoons and debris, so routine renewal helps keep the brood nest in better condition. The three-year recommendation applies to all brood comb in the box, not just the frames that look most worn.
- Keep the purpose clear: a Bailey method replaces comb; it does not diagnose or treat disease. If you suspect a problem such as Nosema, assess the colony’s condition and follow the relevant disease-specific instructions. Comb renewal can form part of apiary hygiene, but it should not be treated as a cure.
- Remember the method’s history when weighing its purpose. Dr Leslie Bailey devised it in the 1950s whilst working at Rothamsted Experimental Station. Its staged transfer allows bees to draw new comb while brood remains in the existing box, supporting gradual renewal rather than an abrupt switch.
- Plan how to handle the old frames before you begin. Once the brood has hatched, you can render the old brood comb for beeswax. Keep the old chamber in place until the remaining brood has emerged, then remove it and set the comb aside for appropriate handling. This keeps brood management and wax recovery in the right order.
- Add the three-year interval to your apiary records. Note when you renew each brood box, then review frame condition during inspections. Recording dates is more reliable than judging by colour alone, as dark comb can be difficult to assess consistently across frames and colonies.
- Prepare the replacement equipment before the work begins, so the clean box and frames are ready when needed. For a practical starting point, browse equipment for hive management alongside your renewal plan.
Queen management during the change
- Find the queen before assembling the boxes and note which frame she is on. On day one, place the clean brood box above the existing chamber, giving the queen access to the upper box as workers draw the starter foundation. Handle her frame carefully, keep it upright, and return it promptly to avoid chilling the brood.
- After a week, check whether the queen has moved up. Look for eggs or young larvae in the upper comb rather than relying only on spotting the queen during a brief inspection. Eggs or larvae confirm she is laying upstairs. Close the hive calmly and let the workers continue drawing comb.
- If the queen is still below on day eight, move her into the new comb. Place a Bailey eke between the brood boxes to provide space at this stage. Before closing the hive, confirm the queen is on the frame you selected. A deliberate transfer keeps her with the replacement brood area.
- For the Nosema procedure, transfer the queen into a sanitised brood box containing at least two drawn combs. Four drawn combs are ideal, with a frame of foundation on each side. This gives her drawn cells for laying while workers can start building on the foundation. Keep this procedure distinct from the method for a healthy colony.
- In that Nosema procedure, remove the transferred queen frame from the upper brood box on day eight. Check the frame carefully before moving it, and keep track of the queen throughout the inspection. When rearranging boxes, make sure you know where she is.
- Once the bees have drawn comb, check again after one or two weeks and place a queen excluder between the boxes. Confirm the queen is above it before separating the brood chambers. The excluder stops her laying in the old comb, while workers can pass between the boxes and care for the remaining brood.
- Keep track of brood development before removing the lower box. Drone development from egg to emergence takes 24 days, while in the Nosema procedure, brood in the lower box is expected to have emerged by day 25-30. Inspect the old frames for remaining brood rather than assuming every cell has hatched on schedule.
- Before finishing, confirm the queen is laying in the new comb and the old chamber no longer contains brood that needs care. Eggs in the upper box and emerged brood in the old one indicate that the queen’s transition is complete. Keep inspections focused so you can track the queen and maintain an organised brood nest.
In the healthy-colony procedure, if the queen has not moved up, move her into the new comb on day 8 and place the Bailey eke between the brood boxes. This keeps the transfer tied to her confirmed location, rather than treating an expected move as certain.
In this Bailey comb-change method, check whether the bees have drawn comb after one or two weeks, then place a queen excluder between the boxes. Following this order maintains the intended separation as the change progresses.
Managing congestion after the comb change
- Once the colony is established on its replacement comb, assess the space available. Look at the queen’s laying area, brood, pollen, and stores. If bees occupy most of the usable comb and fresh nectar is arriving, add a super. This gives incoming nectar somewhere to go and preserves brood-rearing space.
- Don’t confuse crowding with temporary activity around the new box. Bees drawing fresh comb may cluster on the foundation, while a strong nectar flow can fill available cells quickly. Check whether the comb is being drawn and used and whether the brood nest has room. Base your next step on the frames, not entrance traffic alone.
- Feed thick syrup if the colony needs support and there isn’t a strong nectar flow. Use 1 kilogram of sugar to 1/2 litre of water, following the specified thick-syrup mixture. Offer it in a suitable feeder, close the hive carefully, and avoid spilling syrup around the entrance, where it can attract robbing bees.
- For a healthy-colony change, prepare around 4-5 litres of sugar syrup for feeding. Give the bees access to the feed while they draw comb and build stores, then review whether they are taking it. Stop feeding when a strong nectar flow supplies the colony. Don’t leave syrup available automatically once the need has passed.
- After feeding begins, check whether the bees are drawing foundation and whether stores are taking up space needed for laying. If syrup is being stored in the brood area, pause feeding and consider whether the colony needs more room. Don’t add feed or space without first inspecting how the bees are using the comb.
- During each inspection, assess both the entrance and the space inside the hive. A dense cluster of bees, packed stores, and little open comb can point to limited working room. Compare these signs with incoming nectar and fresh comb. Adjust the space to how the colony is using it rather than leaving unused equipment in place.
- Keep feeding and congestion control distinct. Syrup supports comb-building when natural forage is limited; extra hive space helps when the colony is filling its available comb. Neither replaces inspection. Record feeding, comb use, and changes to the hive so your next assessment reflects the colony’s progress.
- Before closing the hive, check that the queen has suitable laying space and that the bees can reach their stores. Remove the feeder when feeding is no longer needed, and adjust the super arrangement to match nectar intake. These checks help stop stored syrup occupying comb needed for brood or incoming nectar.
What equipment is needed for a Bailey comb change?
- Set out a clean brood box that matches the existing hive format. Check that it fits securely before transferring frames. You’ll also need enough starter-strip frames to match the occupied frames in the lower box. Matching the frame count gives the bees room to work above the existing brood nest.
- Prepare the foundation for the new box. This method uses a central frame with a diagonally cut triangular sheet of foundation. A half sheet can encourage the bees to draw wax with less influence from the cell size imprinted on the foundation. Fit it securely so it stays in place during handling.
- Have a feeder and syrup ready if the colony needs feed to draw comb. For a healthy-colony change, prepare around 4-5 litres of syrup. The equipment list should include a suitable feeder, as well as a way to carry and pour syrup without spilling it around the hive.
- Keep a queen excluder and Bailey eke close by for the later stages. The excluder separates the queen from the old brood box once she has moved up; the eke fits between the boxes when needed. Having both ready lets you complete the next inspection without searching for equipment.
- Prepare clean replacement hive-floor equipment. This method recommends replacing the floor at both the beginning and end of the comb-change process. Have the replacement ready before opening the hive so you can change the floor promptly while protecting the bees and brood.
- Plan how you’ll handle old frames and boxes after brood emerges. The described cleaning process dismantles frames, knocks back protruding pins with a 4-ounce Warrington-pattern hammer, and immerses frame parts in bleach solution for two or three days. It uses 50% new parts when reassembling frames. Keep old comb separate until brood has hatched.
- For wooden hive parts, the described method heats the surface to about 200°C with a blow lamp without charring it. Cleaned frame parts are left outdoors to weather for several weeks; cleaned hive-part exteriors receive several coats of raw linseed oil. Treat these as separate preparation tasks, completed away from the active hive.
- Lay out the brood box, frames, foundation, feeder, excluder, eke and replacement floor before starting. This equipment supports each stage, from setting up the clean box to managing the old chamber. Arrange your hive equipment before beginning, so essential components are ready for the planned change.
BS Honey Bees: F1 Buckfast Queens
BS Honey Bees Ltd supplies F1 Buckfast Queens for beekeepers considering queen replacement alongside a planned comb change. A comb change renews brood comb; it doesn’t itself require replacing the queen. If your colony also needs a new queen, compare the available options with your apiary plans. BS Honey Bees Ltd also offers Carniolan Queens, plus 5 / 6 Frame Nucs and 2 in 1 Poly Nucs for beekeepers establishing or expanding colonies.
Choose the equipment or bees that fit your next step, whether that’s maintaining an existing colony or preparing for a new one. For information about the available offerings, contact BS Honey Bees Ltd or visit bshoneybees.co.uk.
Plan your next apiary steps
Use your next inspection to decide which colonies need a planned change and which need attention for another reason. Record your observations and intended actions together so you can prepare equipment and avoid unrelated changes at the same time. This makes how to do a Bailey comb change one part of considered apiary management, rather than a task to start without assessing the colony.
Keep your priorities in view: maintaining existing colonies, preparing for new ones, or choosing bees and equipment for your apiary. BS Honey Bees supplies queen bees, nucleus colonies, hives, frames, and beekeeping apparel to support these needs. Explore the range and choose the next step that fits your plans.
Explore BS Honey Bees’ beekeeping range, and move into the coming season with a clear plan.
Frequently Asked Questions
What is a Bailey comb change in beekeeping?
A Bailey comb change is a staged way to renew brood comb while keeping the colony in its hive. The bees draw replacement comb in another brood box, and you remove the old comb after its brood has emerged. If you’re learning how to do a Bailey comb change, remember that its purpose is comb renewal, not queen replacement or disease treatment.
When is the best time to do a Bailey comb change in the UK?
Early spring is generally the best window, with March suitable when colony strength and conditions support comb-building. For a successful Bailey comb change, time the start around active bees and local weather rather than relying on the calendar alone. Cold conditions can slow foundation drawing, and a weak colony may struggle with the work.
How do you keep the queen safe during a Bailey comb change?
Track the queen’s location at every inspection. Check frames before rearranging boxes, and don’t fit a queen excluder until you’ve confirmed she is in the upper box. Inspect after a week; if she is still below on day eight, transfer her to the new comb. At the next inspection, look for eggs or larvae upstairs to confirm she is laying there.