

What if the safest way to open a stubborn hive is to use less force, not more? Propolis can bind boxes and frames tightly, making an inspection awkward, especially when you’re unsure which end to use. Understanding the main hive tool uses helps you work as a controlled lever and scraper, freeing hive parts without crushing comb or forcing frames.
If you’ve hesitated before putting a metal edge near delicate comb, that caution is sensible. The right technique depends on the task: one edge can separate boxes, another can scrape wax and propolis, and a J-hook, where fitted, can help lift a frame. Use each carefully, keeping the tool against equipment rather than comb.
This guide explains what each edge is for, how to open a hive and loosen frames with care, and what to avoid to protect your equipment. You’ll also find a practical routine for cleaning and storing your tool after an inspection.
Key Takeaways
- Propolis and wax can bind hive parts during normal colony activity. The right tool helps separate them without forcing the equipment.
- Use a hive tool to break seals, free frames and scrape deposits from suitable equipment surfaces.
- Flat, J-hook and combination designs have different working ends. Identify which end suits the task before applying pressure.
- Use a deliberate sequence to reduce the risk of damaging frames or comb, then check and store your tool after the inspection.
What Is a Hive Tool? The Beekeeping Uses at a Glance
A hive tool is a sturdy hand tool for separating, lifting and scraping hive components. Its narrow working edge helps release parts that resist movement, while your other hand supports the equipment. The main hive tool uses are straightforward: opening joined hive parts, loosening frames and removing excess wax or propolis from suitable surfaces. It’s an aid to careful handling, not a reason to force a stuck component.
Bees naturally work propolis and wax around the hive. As a result, parts can feel firmly joined even when everything is in normal working order. Use the tool to apply controlled leverage at a joint rather than twisting a box or pulling abruptly. A smoker serves a different purpose during an inspection, while a frame grip helps hold a frame. Neither replaces the hive tool’s role in loosening equipment. For a broader overview of its purpose and common forms, see this guide to the hive tool.
Why hive parts stick together
Propolis is a resinous material bees use to seal gaps and secure movable parts. It can form a bond between box edges or around frame rests. Wax may also build up where frames meet the hive, making a frame harder to lift. This resistance is a normal result of colony activity, not necessarily a fault. Identifying where a part is catching helps you work at the joint instead of applying force elsewhere.
For example, if two boxes don’t separate readily, their edges may be sealed with propolis. If a frame catches, wax or propolis may be holding it at a contact point. Use the tool to break that adhesion; don’t drive it deeply into the hive or scrape every surface clean during the inspection.
The basic parts of a hive tool
Most designs have a handle for a secure hold and one or more working ends. Some have a flat, tapered edge, while others include a hooked or bent end. Learn the profile of your own tool before starting, because the ends aren’t interchangeable for every task. A quick visual check helps you avoid using a hooked edge where a flatter contact would be more suitable.
Labelled guide:
- Handle: the part you hold to guide and control the tool.
- Flat working edge: commonly used to get between joined hive parts or scrape deposits from equipment.
- Hooked or bent end, if fitted: typically used to catch and help raise a frame.
Treat these labels as a starting point, not a universal rule. Designs vary, so identify the working edge before placing it against a box or frame. With British National hives and frames, as with other equipment, consider where the tool will make stable contact and avoid levering against delicate parts. The tool assists the inspection; steady hands and gentle handling still do the rest.
Hive Tool Uses During an Inspection: Separate, Lift, and Scrape
During an inspection, a hive tool makes small jobs more controlled. Its main uses fall into three groups:
- Breaking seals: work an edge into a joined seam to release boxes or other components.
- Freeing frames: loosen a frame at its contact points before lifting it out.
- Scraping deposits: remove excess wax or propolis from suitable equipment surfaces.
Apply leverage close to the joint. A small movement at the edge can separate the parts without twisting a box or wrenching at a frame. Once the seal is released, put the tool aside and lift the component by hand, keeping it supported and level. This helps prevent a sudden shift that could knock neighbouring equipment or disturb comb.
Freeing boxes and other hive components
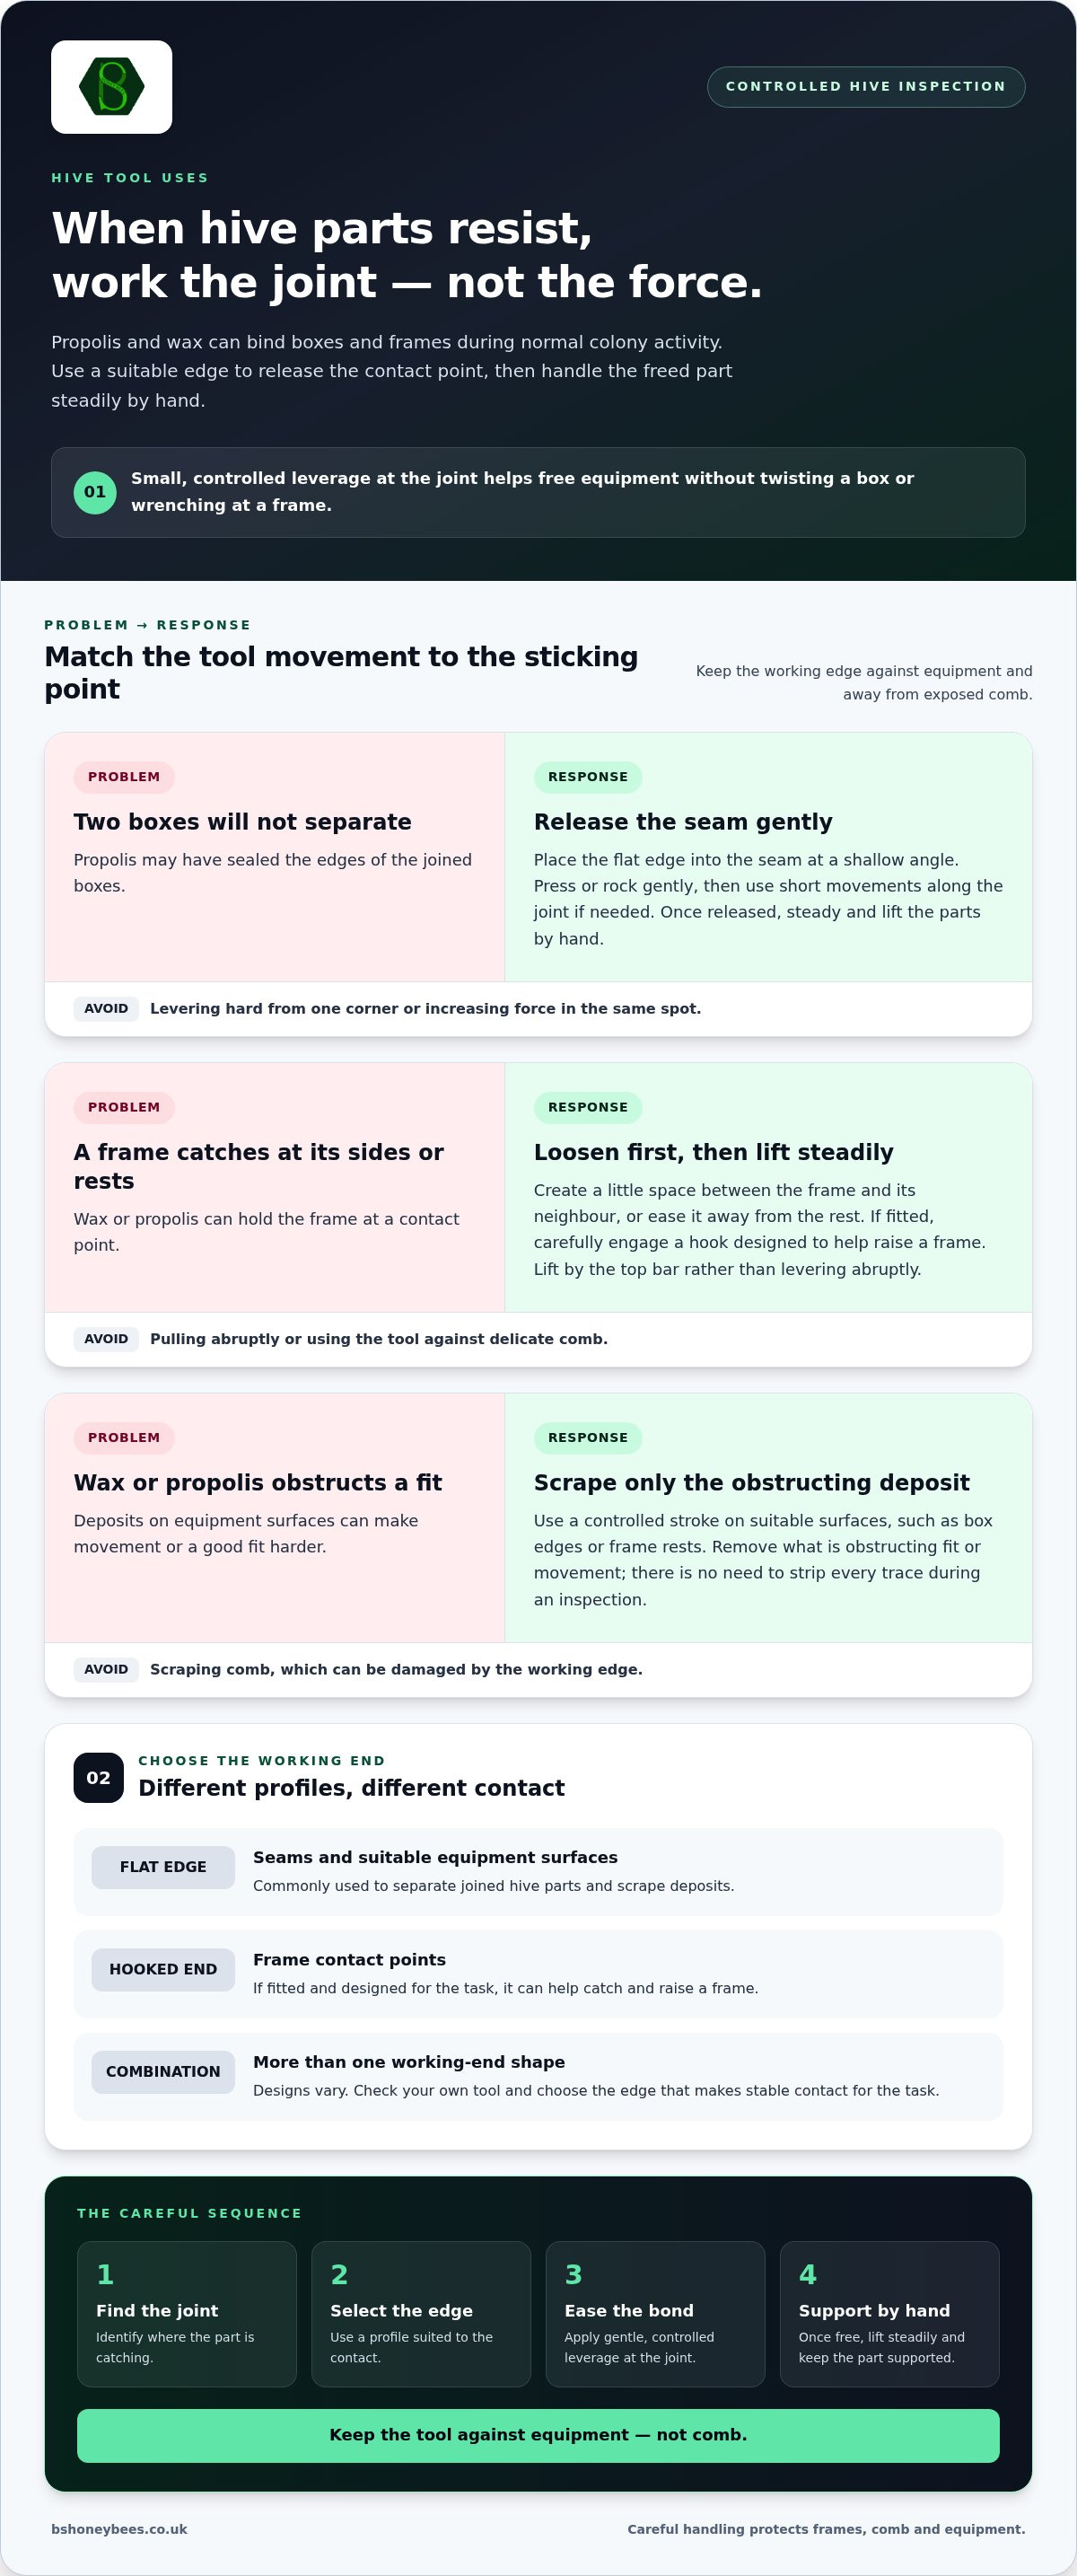
Find the seam between the joined parts and place the flat edge into it at a shallow angle. Press or rock the tool gently to start a gap, then work along the joint with short, controlled movements if needed. Avoid levering hard from one corner, which can strain the box or make it tilt. When the seal gives, steady the parts and lift them by hand.
If a box doesn’t release immediately, reposition the edge at another point along the seam rather than increasing force in the same spot. Keep the tool against the equipment, away from exposed comb. The aim is to break the bond between components, then handle each part securely once it’s free.
Loosening frames and scraping deposits
Frames can be held by propolis or wax at their sides or rests. Use a suitable edge to create a little space between the frame and its neighbour, or ease it away from the rest. If your tool has a hooked end designed for this job, engage it carefully. Loosening is only the first step: lift the frame steadily by its top bar rather than levering it abruptly out of the hive.
Scrape excess deposits from suitable equipment surfaces, such as box edges or frame rests, using a controlled stroke. Keep the working edge away from the comb itself, which can be damaged by scraping. Remove only what’s obstructing a good fit or movement. Propolis and wax are part of normal hive activity, so there’s no need to strip every trace away during an inspection.
Careful handling helps preserve the fit and condition of hive equipment. If you’re working with British National equipment, BS Honey Bees Ltd supplies British National hives and frames.
Flat, J-Hook, or Combination Hive Tool: Which End Does What?
The working end determines how a hive tool meets a box, frame or other component. A flat edge is suited to seams and scraping, while a hooked end can help free a frame. Combination designs bring more than one shape together. These are typical tasks, not fixed rules: profiles vary between makers and beekeeping traditions, so inspect your own tool and learn how each end feels in use. No single design suits every beekeeper or inspection.
| Design | Working-end shape | Typical task | Handling consideration |
|---|---|---|---|
| Flat-ended | Broad, flat or tapered edge | Starting a gap at a joined seam; scraping deposits from suitable equipment | Keep the edge on equipment, away from delicate comb. |
| J-hook | Curved or hooked end | Catching and helping to raise a loosened frame, depending on the design | Engage the frame carefully; don’t pull sharply. |
| Combination | Two differently shaped working ends | Using one end for seams or scraping and the other for frame work | Check which end is in your hand before applying pressure. |
Hive parts vary too. The British National beehive guide gives useful context on the components you may handle. Knowing where frames sit and how boxes meet helps you choose a working edge that fits the angle, rather than forcing the tool into an awkward position.
What a flat-ended hive tool is suited to
A flat edge gives you a broad contact point for easing apart a box seam. Set it against the joint and use measured pressure to begin a gap. The same edge may scrape excess propolis or wax from suitable surfaces, such as equipment edges or frame rests. Keep it clear of comb, as scraping can damage the cells. Use the edge for the task it suits, not as a blade to force through resistant material.
When a hooked or combination end can help
A hook-shaped end can catch a frame and assist with lifting it once it’s been loosened. Its shape and leverage vary, so position it securely and raise the frame steadily. A combination tool offers different working shapes, but you still need to select the end that matches the task. More leverage isn’t a reason to apply more force. If a frame resists, reassess its contact points and reposition the tool.
Before an inspection, practise orienting the tool on empty equipment. Place each end at a box seam and alongside a frame without levering hard. Notice where the tool makes stable contact and how the handle moves. This rehearsal makes it easier to select an appropriate edge during an inspection, when bees, frames and delicate comb all need careful handling. The right choice supports controlled movement; it doesn’t replace a steady lift.
How to Use a Hive Tool Safely Without Damaging Frames or Comb
Good technique means placing the tool accurately and using only enough leverage to release a joint. Excessive force can split or strain wooden components, loosen frame parts or crush comb. Keep your movements deliberate, maintain a stable stance, and direct the working end away from bees where practical. Wear suitable protective clothing, such as a bee suit, and stay calm and focused throughout the inspection.
A controlled method for separating hive parts
Use this sequence for a stuck box seam or frame. Check your position at each step before applying more pressure.
- Assess the joint. Look at how the components meet and identify a point where the edge can make contact without touching comb.
- Place the working edge. Set the flat or otherwise suitable end into the seam. Keep your free hand clear of the point where the parts may shift.
- Apply controlled leverage. Use gentle pressure or a small rocking movement. If the joint doesn’t release, ease off and try a different contact point instead of forcing the tool.
- Lift steadily. Once the bond is released, stabilise the component, then lift it by hand with even support. Keep it level as you move it clear.
For a frame, first loosen the contact points between it and adjacent frames or the frame rest. Then lift it steadily by the frame, rather than using the tool to haul it out. A little patience helps avoid sudden movement that could catch neighbouring comb or unsettle the arrangement.
Common mistakes that cause damage
Don’t lever directly against delicate comb or frame foundation. These surfaces can give way under pressure, even if the tool seems securely placed. Avoid twisting a frame while it’s still stuck, too: the turning force can strain the frame or disturb the comb it supports. If a part won’t move, pause. Check that the edge is on a suitable equipment surface, then reposition it and try a smaller movement.
Keep the tool under control as a joint opens. A component can release suddenly, so don’t put fingers between the parts or leave a hand where the box may settle. Support loose equipment before lifting and place it somewhere stable. The aim is a small release followed by a calm lift, not one forceful action. These habits make the practical hive tool uses safer for both the beekeeper and the equipment.
Protective clothing is part of a prepared inspection. Explore BBWear bee suits as you organise the kit you use around the hive.
After the Inspection: Clean, Check, and Store Your Hive Tool
A quick check at the end of an inspection keeps your kit organised and your tool ready for its next use. Remove visible wax and propolis, look over the tool for damage, then put it somewhere dry and secure. Don’t guess at a cleaning chemical or disinfection routine. If disease-control advice applies, follow current authoritative guidance for the situation.
Remove residue and inspect the tool
Clear visible deposits from the working ends and handle using a suitable method that won’t damage the tool or spread residue onto other equipment. Avoid assuming that one chemical or disinfection process is appropriate in every situation. If you’re responding to a suspected disease issue, use current authoritative bee-health advice rather than relying on a general tool-care routine.
Before putting the tool away, check that its edges haven’t become bent, chipped or excessively worn, and that the handle remains secure. Damage can make it harder to position the working end accurately at the next inspection. If residue obscures an edge or a crack, remove it carefully so you can see the tool’s condition clearly.
Keep your inspection equipment ready
Choose a dry, secure storage place where the tool won’t be buried beneath other equipment or left where someone could catch a hand on its edge. Return it to the same spot in your inspection kit each time. A consistent routine makes it easier to find when needed and helps prevent sharp working ends from damaging other items.
Think of the hive tool as part of a complete inspection set-up. Check your other equipment as you pack away, and make sure your protective clothing is ready for the next visit. Review the fit of your bee suit as part of that preparation.
Cleaning, checking and storing the tool keeps your equipment in order and supports confident use of its different edges. After learning the key hive tool uses, return your kit to a dependable routine. Explore the beekeeping equipment range and related hive guidance as you organise the equipment you use for inspections.
Make Each Inspection More Confident
Use your next inspection to build a steady, repeatable approach. Before opening the hive, take a moment to orient yourself to the equipment and the tool in your hand. Afterwards, note anything that felt awkward or where a component needed extra care. These observations can help you make more considered choices next time and protect both your equipment and the colony’s comb.
Confidence comes through attentive practice, not force. Keep learning how your hive is arranged, and make your inspection kit work smoothly as a whole. The hive tool uses covered here are a practical starting point; careful observation will help you refine your handling over time.
As you prepare for future inspections, explore beekeeping equipment and hive guidance to support your next steps. Approach each visit calmly and work with care.
Frequently Asked Questions
What is a hive tool used for in beekeeping?
A hive tool helps beekeepers work with parts of a hive during inspections. Common jobs include releasing joined components, loosening frames and clearing deposits from suitable equipment surfaces. It’s a practical hand tool, not a substitute for other kit: a smoker and protective clothing have different roles. Learning the main hive tool uses helps you choose the right working end for each task.
Can I use a hive tool to lift frames?
Yes, a suitable hooked end can help raise a frame after it has been loosened. Control the frame itself as it comes out, especially if it contains brood or stores. A frame grip, where used, is separate equipment designed to hold frames. Avoid relying on the hive tool alone to carry a frame across the apiary.
Is a J-hook hive tool better than a flat hive tool?
Not for every beekeeper or task. A J-hook can make it easier to catch and start lifting a frame, while a flat edge is useful for working at seams and scraping suitable surfaces. The best fit depends on the jobs you do and how confidently you can position the tool. Choose for controlled handling and learn its orientation before an inspection.
How do you loosen a stuck beehive box?
Check where the box edges meet and find a point where the tool can enter without touching comb. Ease the working edge into the seam, then make a small movement. If one corner stays bound, try another point rather than pulling the box sideways. Alternating contact points can help release the join evenly. Once free, make sure the box is stable before lifting.
Can a hive tool damage frames or comb?
Yes. A sharp edge or forceful leverage can mark wood, strain a frame or tear delicate comb. After handling a resistant frame, check its top bar and sides for cracks or loosened joints before returning it to the hive. If comb is damaged, avoid pressing it back into place with the tool. Work gently around it and keep the working edge on equipment surfaces.
How should I clean a hive tool after an inspection?
Remove visible wax and propolis using a suitable method, then check the edges and handle for wear or damage. There isn’t one cleaning chemical or disinfection routine that should be prescribed for every situation. If you’re dealing with a suspected disease concern, follow current authoritative bee-health guidance for cleaning equipment. Store the tool securely once it’s clean and checked.
Do beginner beekeepers need a hive tool?
Yes, it’s a core hand tool for working with hive components, which can become bonded by propolis and wax during normal colony activity. Before using one around bees, practise placing its edges against empty equipment so you understand how the tool sits and moves. Rehearsing can help you avoid uncertain movements during an inspection and build confidence with the kit you’ll use regularly.