

Your first nucleus colony represents more than just a purchase; it's the heartbeat of your apiary's future. Yet, for many, the moment you prepare to move those frames into a full-sized brood box is fraught with genuine anxiety. You aren't alone if you've spent the night worrying about accidentally rolling the queen or causing the colony to catch a chill in a large, drafty space. It's a delicate operation that requires more than just steady hands; it requires a professional approach to thermal management and bee behaviour.
This masterclass will show you exactly how to transfer nuc to hive with the precision of a seasoned expert. We'll outline the essential techniques to maintain the thermal integrity of the cluster and ensure your queen continues laying without interruption. From perfect frame orientation to the logistical setup of your British National hive, you'll gain the confidence to manage this transition with zero bee mortality. We'll walk through the step-by-step process of organising your new hive for immediate success, ensuring a calm, productive apiary from day one.
Key Takeaways
- Identify the precise temperature thresholds required to prevent brood chilling and ensure a safe environment for your developing colony.
- Learn how to transfer nuc to hive using a methodical frame-by-frame approach that preserves the vital integrity of the brood nest.
- Prepare your British National hive with correctly tensioned frames and dummy boards to optimise heat retention within the larger brood box.
- Master the "position swap" technique to ensure all foragers return to the new hive location without confusion or loss of colony strength.
- Implement essential post-transfer feeding strategies to stimulate rapid comb building and help the queen settle into her new environment immediately.
Timing and Preparation: When to Transfer Your Nucleus Colony
A nucleus transfer is the clinical process of moving a 5 or 6 frame nucleus colony into a full-sized 10 or 11 frame British National brood box. This isn't a task to be rushed or performed on a whim. Success depends on precise environmental conditions and an understanding of bee physiology. Understanding how to transfer nuc to hive starts with respecting the thermal requirements of the brood. If you expose young larvae to temperatures below the 14°C to 16°C threshold, you risk brood chilling. This condition can lead to significant colony setbacks or even total loss of the upcoming generation of foragers.
The breed of your bees also dictates your approach. F1 Buckfast colonies are renowned for their calm temperament, making them ideal for beginners during this transition. However, even the most docile Carniolan queen can become stressed if the transfer is performed in poor conditions. A warmish, dry day with minimal wind is non-negotiable. High winds don't just make handling frames difficult; they rapidly strip heat from the exposed brood nest during the few minutes the frames are outside a protective box.
The 48-Hour Settling Rule
Bees need time to orientate. When your nuc arrives at your apiary, resist the urge to open it immediately. Place the nuc box directly on top of the hive stand where the permanent British National hive will eventually sit. Open the entrance and let them fly. They need 24 to 48 hours to map their new surroundings and begin foraging. You'll know they're ready when you see steady pollen collection and calm, purposeful entrance behaviour. Rushing this settling period often results in confused foragers returning to an empty spot once the nuc box is moved, leading to unnecessary bee loss and a weakened start for your colony.
Weather Windows and Seasonal Considerations
Timing your transfer for mid-afternoon is a professional tactic that simplifies the process. Between 1:00 pm and 3:00 pm, a large percentage of older, more defensive foragers are out in the field. This leaves a younger, gentler population inside the box, making the move significantly easier for the beekeeper. Be wary of the "cold snap" trap common in early British springs. A sunny morning can be deceptive; always check the forecast for the following 48 hours. If the weather turns whilst you're mid-transfer, stop immediately. Return the frames to the nuc box, close the lid, and wait for a stable window. Learning how to transfer nuc to hive effectively means knowing when to walk away and wait for better conditions.
The Essential Kit: Preparing Your British National Hive
Success begins with your hardware. Before you master the physical movements of how to transfer nuc to hive, your equipment must be meticulously prepared. The British National hive is the standard for a reason; its design offers the ideal volume for our native climate and specific bee genetics. Ensure you have a solid floor, a deep brood box, a crown board, and a roof ready. For a new colony, always set the entrance block to the smallest opening. This reduced entrance helps a smaller colony defend their new home against wasps or robber bees whilst they are still establishing their numbers.
Frame quality is often overlooked by novices, yet it dictates the future health of the colony. Use high-quality British National hives and frames from BS Honey Bees Ltd, fitted with fresh, wired wax foundation. Check the wire tensioning before you begin; if the wire is slack, the wax will sag under the weight of the brood and honey, leading to irregular "brace comb" that makes future inspections a nightmare. Your extra frames should be clean and ready to slot in alongside the nucleus frames to fill the remaining space in the brood box.
Brood Box Configuration
If you are using second-hand equipment, you must be thorough. Scorching the internal timber with a blowlamp is the only way to ensure the destruction of latent pathogens like Nosema or EFB spores. However, starting with a new hive is always the safer investment for a fresh nucleus. Arrange your components logically at the apiary site; if you need professional help to install a level concrete base or perimeter fencing, finding leads for tradespeople UK via Trade-Hive can connect you with local experts to ensure your site is perfectly prepared. Place the floor and brood box in the exact position the nuc box currently occupies. Have your dummy boards and remaining foundation frames within arm's reach so you can complete the transfer quickly without leaving the brood exposed to the air for longer than necessary.
Protective Gear and Tools
Your mental state affects the bees. If you are nervous about stings, your movements will be jerky and aggressive. Professional BBWear suits are the preferred choice for UK professionals because they offer unparalleled sting protection whilst maintaining excellent visibility and breathability. Ensure your veil is zipped tight and your gloves are tucked securely into your sleeves.
Prepare your smoker with natural fuel like dried lavender, rotten wood, or pine needles. You want a cool, thick white smoke, not a hot blue flame that can singe bee wings. A clean, sharp hive tool is your final essential; keep it in a bucket of washing soda between uses to prevent the cross-contamination of hives. When you understand how to transfer nuc to hive with the right tools, the process becomes a calm, methodical transition rather than a stressful event.
The Science of Frame Arrangement and Thermal Efficiency
Maintaining brood nest integrity is the most critical factor when learning how to transfer nuc to hive. In their original box, the bees have meticulously organised their home. They place stores of pollen and honey on the outer edges to act as insulation, whilst the queen and brood occupy the protected centre. Disruption of this sequence forces the bees to expend energy reorganising rather than expanding. You must keep the frames in the exact order and orientation they were in the nuc. If you flip a frame, you disrupt the carefully managed bee space and the faces of the comb, which often leads to the bees building bridge comb to repair the gap.
The volume of the new hive is your biggest challenge. A standard British National brood box is significantly larger than a 5 or 6 frame nucleus. Without intervention, this extra space acts as a heat sink. Heat generated by the cluster dissipates into the empty corners of the box, forcing the bees to consume more stores just to keep the brood at the required 35°C. This is why professional-grade dummy boards are essential tools for any UK beekeeper. They allow you to manage the internal environment with surgical precision, ensuring the colony's energy is spent on growth rather than survival.
The Centralised Nest Method
Position your nucleus frames in the dead centre of the new brood box. This centralised placement allows for even heat distribution and gives the colony the shortest distance to travel for expansion on either side. Place your new frames of foundation on the immediate outside of this established cluster. Use the "Squeeze" technique: push all frames together tightly until the side bars touch. This ensures the correct bee space is maintained. Any gaps left between frames will inevitably be filled with wild, messy comb that makes future inspections impossible and risks crushing bees during the move.
Using Dummy Boards Effectively
Treat your dummy boards as moveable walls. When you understand how to transfer nuc to hive, you realise that "empty" space is the enemy of a developing colony. If you are transferring one of our 5 or 6 frame nucs, you will have several empty spaces on either side of the cluster. "Sandwich" the colony by placing a dummy board on both ends of the frame run. This effectively reduces the internal volume of the hive, trapping the warmth where it is needed most. As the colony grows and the bees begin to "draw out" the new foundation on the edges, move the dummy boards outward and add one frame at a time. This methodical expansion ensures the colony never has more space than they can effectively heat and defend during the unpredictable British spring.
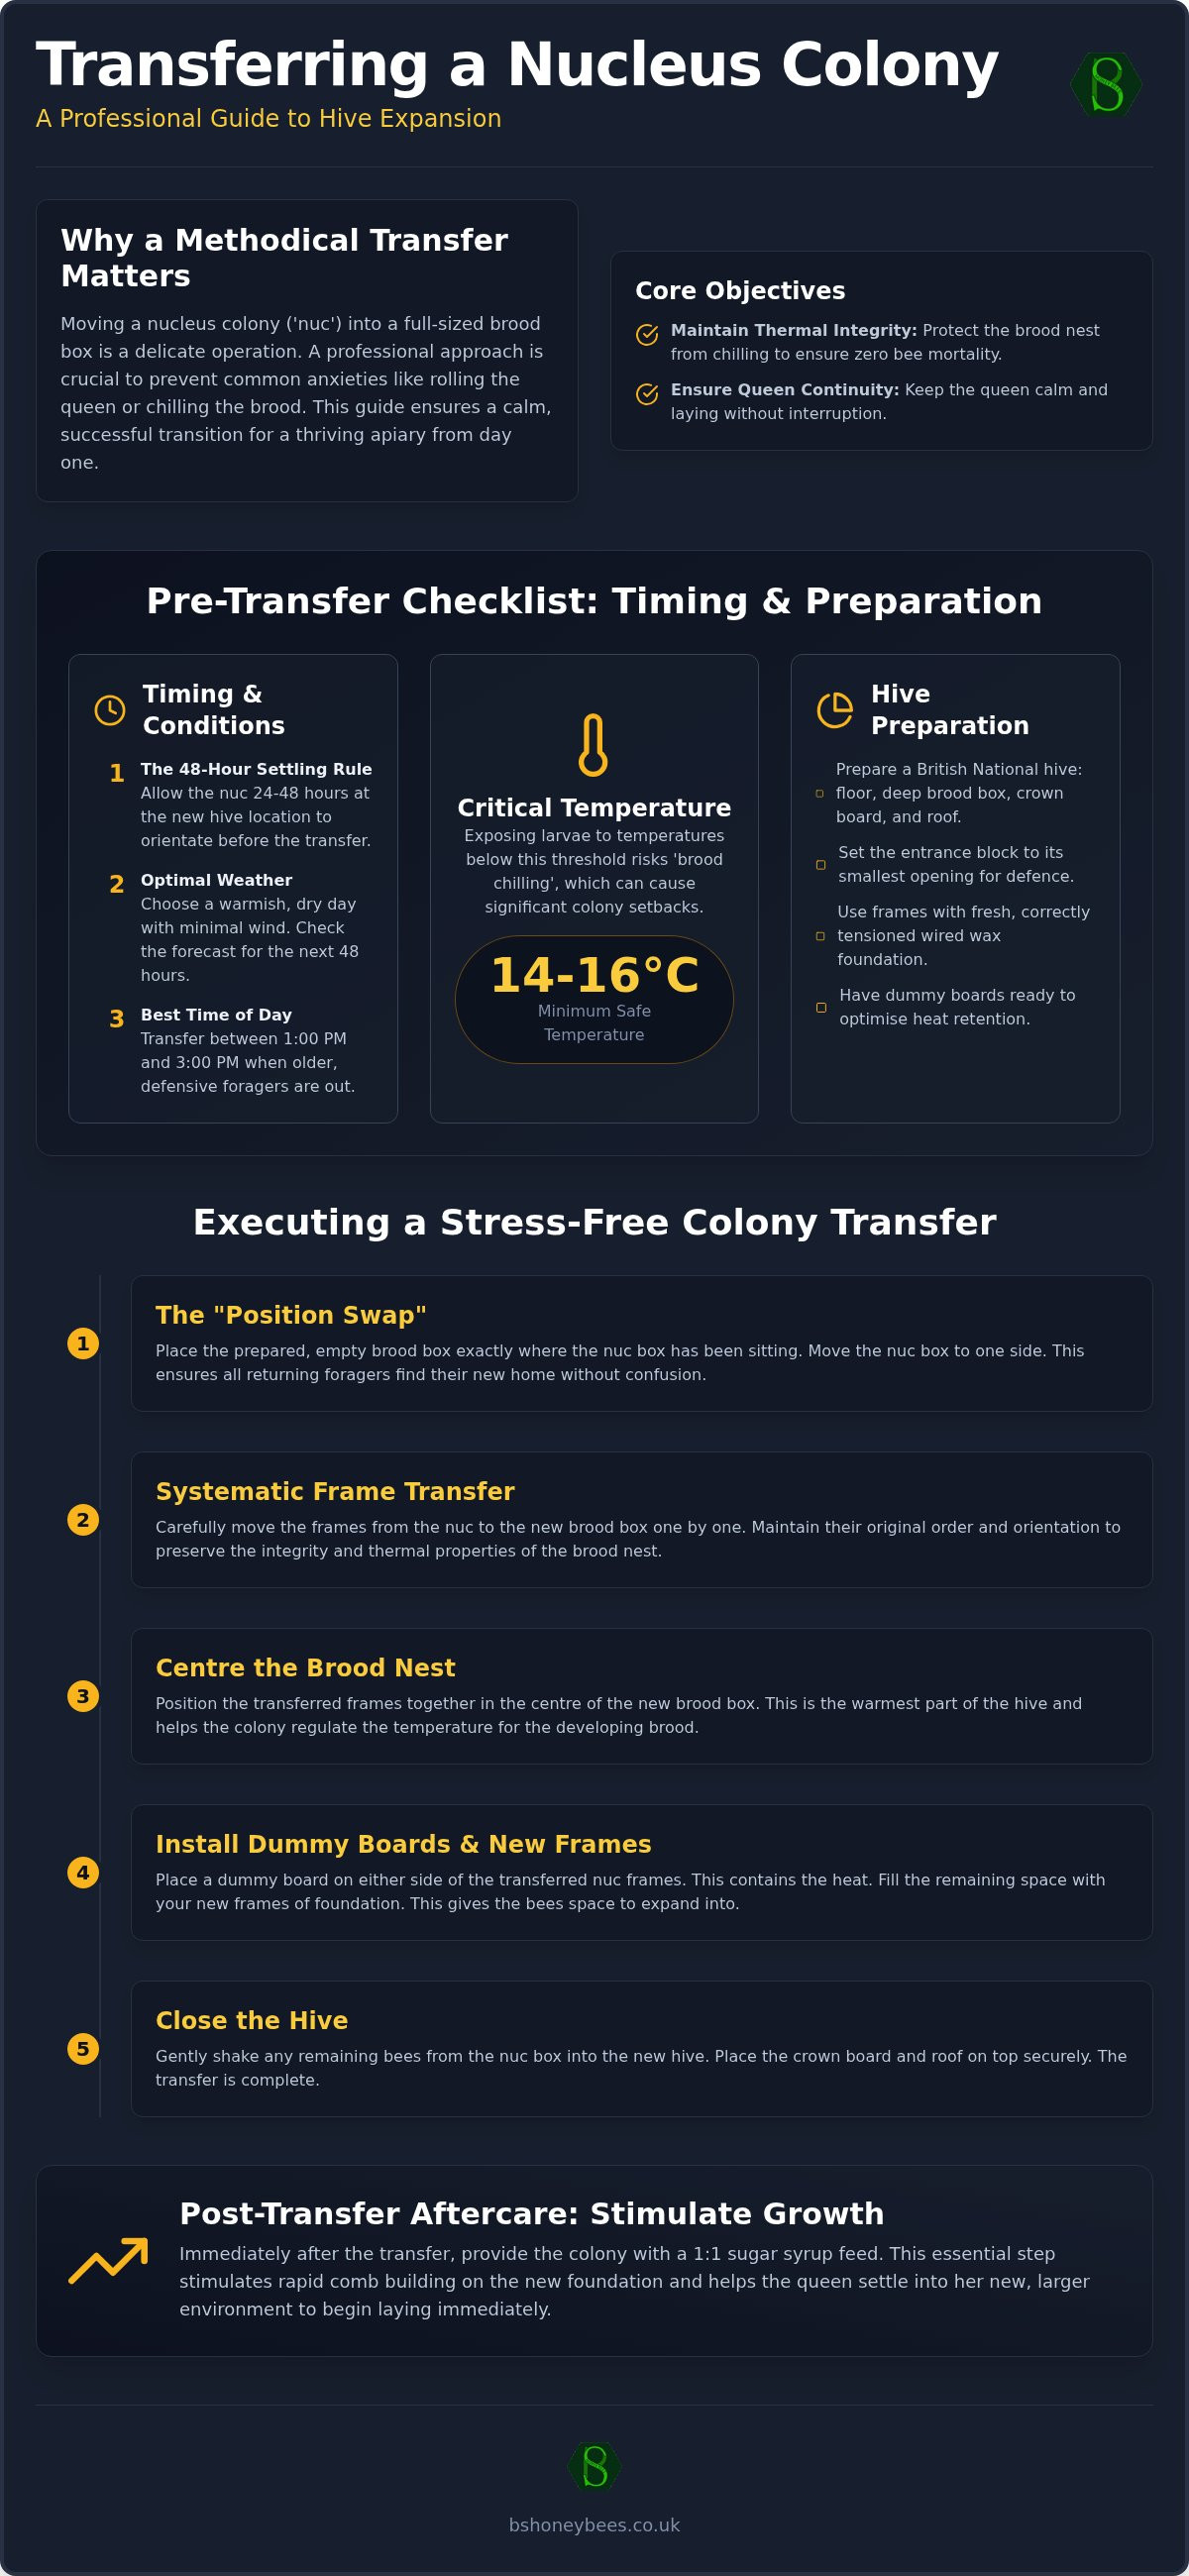
Step-by-Step: Executing a Stress-Free Colony Transfer
The physical execution of how to transfer nuc to hive requires a steady hand and a methodical rhythm. Begin by puffing a small amount of cool, white smoke into the entrance of the nucleus box and under the lid. Wait thirty seconds for the bees to retreat to the frames and begin engorging on honey, which naturally calms their temperament. Move the nuc box approximately one metre to the side or rear, and immediately place your prepared British National brood box on the hive stand in the exact spot the nuc previously occupied. This ensures that any foragers returning from the field fly directly into the new hive entrance rather than circling an empty space.
Lifting frames vertically is the most effective way to avoid "rolling" the queen. Rolling occurs when a frame is pulled out at an angle, crushing the queen between the comb faces of adjacent frames. This is a leading cause of queen loss during transfers. Keep your movements slow and deliberate. If you are starting your journey with one of the 5 / 6 Frame Nucs from BS Honey Bees Ltd, you'll find their calm genetics make this process significantly smoother, but professional handling remains essential for the colony's safety.
Handling the Frames
Use the "First Frame" trick to create working room. Identify the frame closest to the wall of the nuc box, which usually contains only honey and pollen. Lift this frame first and place it into the centre of your new brood box. This creates a gap in the nuc, allowing you to slide the remaining frames sideways before lifting them, which significantly reduces the risk of queen injury. Inspect each frame briefly for the queen as you move it. If you spot her, simply note her position and continue. Maintain the exact sequence of the frames to preserve the integrity of the brood nest as discussed in the previous section.
Dealing with the Nuc Box Residue
Once all frames are transferred, you'll likely find a few hundred bees still clinging to the floor and walls of the empty nuc box. If you've already spotted the queen on a frame and she's safely inside the new hive, you can use the "Gentle Shake" method. Invert the nuc box over the open brood box and give it one firm, sharp shake to dislodge the remaining bees. However, if you didn't see the queen during the frame move, don't shake. Instead, place the open nuc box on the ground with the entrance facing the new hive's entrance. The bees will naturally march toward the pheromones of the queen. Never leave the empty nuc box open and unattended near the hive entrance for long periods, as this can encourage robbing behaviour from other colonies. Finish by ensuring your entrance block is on its smallest setting to help the colony defend their new, larger home.
Post-Transfer Aftercare: Ensuring Your Queen Settles In
The physical move is complete, but the biological transition is just beginning. Your primary goal now is to ensure the queen resumes laying and the colony begins expanding into the empty foundation. Learning how to transfer nuc to hive effectively includes this critical settling phase. Even if you see a natural nectar flow, you must provide supplemental feed. Bees require significant energy to produce the wax needed to draw out new frames. Without this boost, a small colony can stall, wasting the momentum of the spring build-up.
Feeding Strategy for New Hives
Mix a thin 1:1 sugar syrup using one part white granulated sugar to one part water by weight. This concentration mimics a light nectar flow and specifically stimulates wax production. Use a contact feeder placed directly over the cluster on the crown board. Contact feeders are superior for new colonies because the bees don't have to break cluster or travel far to access the syrup, unlike large rapid feeders. Always fill and place feeders in the evening. This prevents robbing behaviour, as the excitement caused by the new food source has time to subside overnight before other colonies are active.
Breed-specific behaviour plays a major role in your management timeline. F1 Buckfast colonies are renowned for their explosive spring growth. You may find they draw out two or three frames of foundation in a single week if weather and feed are consistent. Carniolan queens are similarly prolific but may require closer monitoring of their stores. Check the outer frames every few days through the crown board without fully opening the hive. When the second-to-last frame is 70% drawn with wax, it's time to add your final frames and remove the dummy boards.
The First Full Inspection
Wait exactly seven days before your first full inspection. Opening the hive too early can stress the queen, potentially causing the workers to "ball" and kill her. During this inspection, your focus is narrow. Don't look for the queen; look for her work. Finding pearly white eggs in the centre of the original nuc frames is the ultimate confirmation of success. Assess their temperament. Are the bees sitting calmly on the comb, or are they runny and agitated? Calmness is a hallmark of high-quality genetics. Finally, use this window to plan your Varroa management. A fresh start in a British National hive is the perfect time to monitor mite drop and ensure your colony remains healthy. Knowing how to transfer nuc to hive is a vital skill, but these aftercare steps turn a simple move into a thriving, productive apiary.
Securing the Future of Your New Colony
Transitioning your bees is a pivotal moment that demands precision. By prioritising thermal mass with dummy boards and maintaining strict frame integrity, you ensure your colony bypasses the stress of relocation. Mastering how to transfer nuc to hive is the foundation of a productive season; it allows your queen to focus on expansion rather than recovery. A calm, methodical approach during these first few days will pay dividends in colony health and honey production throughout the summer months.
As F1 Buckfast and Carniolan specialists, we provide the genetics and hardware required for a seamless start. Whether you need professional-grade BBWear suits for maximum confidence or high-quality British National equipment, we offer nationwide UK delivery of live bees directly to your apiary. Order your F1 Buckfast Nucleus and British National Hive from BS Honey Bees Ltd today to begin your journey with the industry gold standard. Your bees are ready to thrive, and with these masterclass techniques, you have everything you need to lead them to success.
Frequently Asked Questions
How long should I wait to transfer my nuc after it arrives?
Wait between 24 and 48 hours before you attempt the move. This settling period is vital as it allows the foragers to perform orientation flights and map the new location of the apiary. Opening the box too soon after the vibrations of transit can lead to heightened defensive behaviour and may cause the queen to stop laying temporarily due to stress.
Do I need to find the queen before moving the frames?
You don't strictly need to find the queen, though many beekeepers find it reassuring. Your priority should be slow, vertical lifting to ensure she isn't crushed between the frames. If you follow the professional steps for how to transfer nuc to hive, she will naturally stay with the brood cluster on the frames as they are moved into the new box.
What happens if I move the frames in the wrong order?
Moving frames in the wrong order disrupts the biological integrity of the brood nest. The bees have organised their home for specific thermal zones; putting a honey frame in the middle of the brood, for example, creates a barrier that the queen may not cross. This forces the colony to waste energy reorganising their stores instead of expanding into the new foundation.
Should I add a queen excluder and supers immediately after transferring?
Don't add supers or queen excluders until the bees have drawn out at least seven or eight frames of the brood box. Adding a super too early creates a massive "heat sink" above the small colony. This extra volume makes it much harder for the bees to maintain the 35°C required for healthy brood development, which can significantly stall their growth.
My nuc is in a polystyrene box; do I need to move it to a wooden hive?
Yes, you must move the colony once it outgrows the nuc box. Whilst a poly nuc is an excellent tool for overwintering or starting a colony, it lacks the volume needed for a full-sized summer population. Moving them to a British National hive ensures your F1 Buckfast or Carniolan queen has the space required to reach her peak laying capacity of up to 2,000 eggs per day.
What is the best type of feeder to use for a newly transferred colony?
A contact feeder is the most effective tool for a fresh transfer. It allows the bees to access 1:1 sugar syrup directly above the cluster without having to travel into a cold, empty part of the hive. This immediate access to energy is essential for the rapid production of beeswax, which the colony needs to "draw out" the new foundation frames you've provided.
Can I transfer a nucleus colony in the rain if I am quick?
Absolutely not. Opening a hive in the rain or during high winds exposes the delicate brood to moisture and rapid heat loss. Chilled brood is a serious condition that can kill off an entire generation of young bees in minutes. Always wait for a dry, calm window with temperatures above 14°C to ensure the colony's health isn't compromised during the move.
Why are my bees clustered on the front of the new hive after the move?
Bees often cluster on the hive front to perform "fanning" and scent marking. They use their Nasonov glands to release pheromones that guide lost foragers to the new entrance. This is a normal part of the orientation process. As long as you see bees entering and exiting with purpose, this clustering is simply their way of helping the rest of the colony find their new home.